A Revolver Ejector-Rod Wrench
Banish Buggered-Up Knurling!
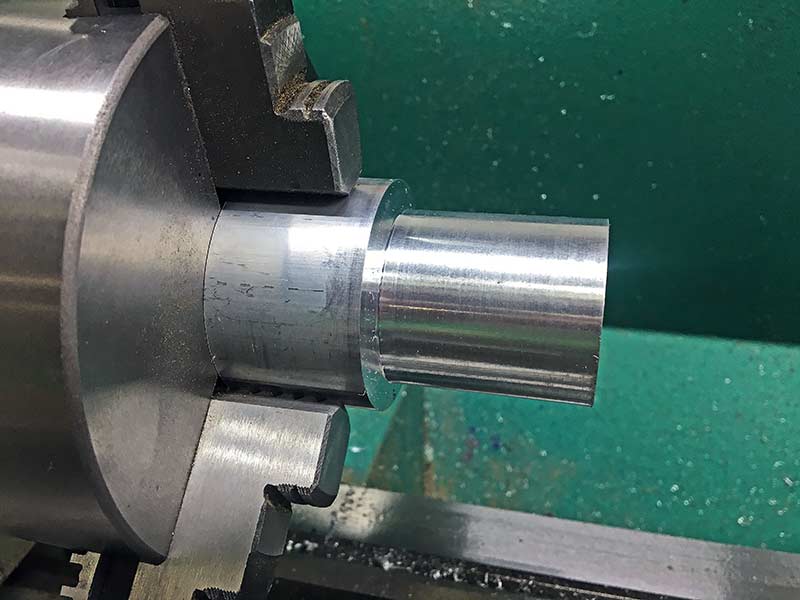
The raw stock was 2" in diameter so it was turned down to 1.5" per
the drawing. Leave enough raw stock to be held in the chuck’s jaws.
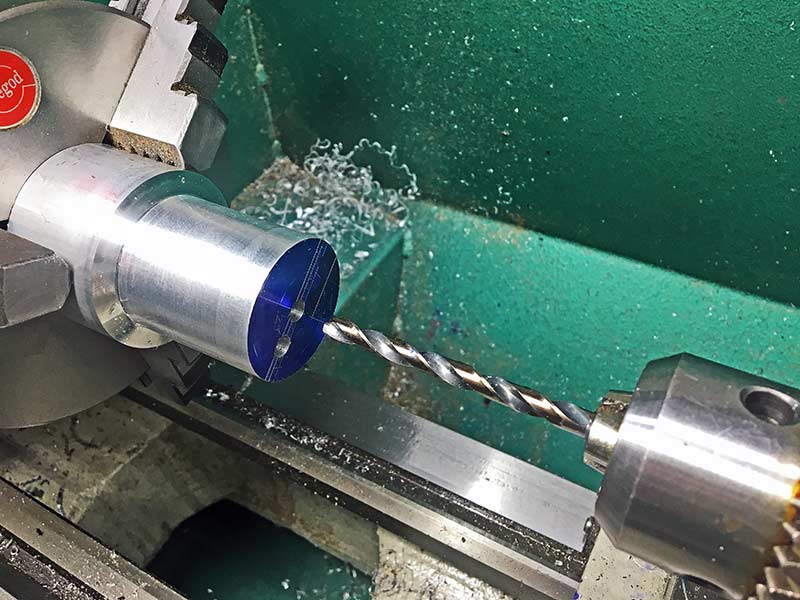
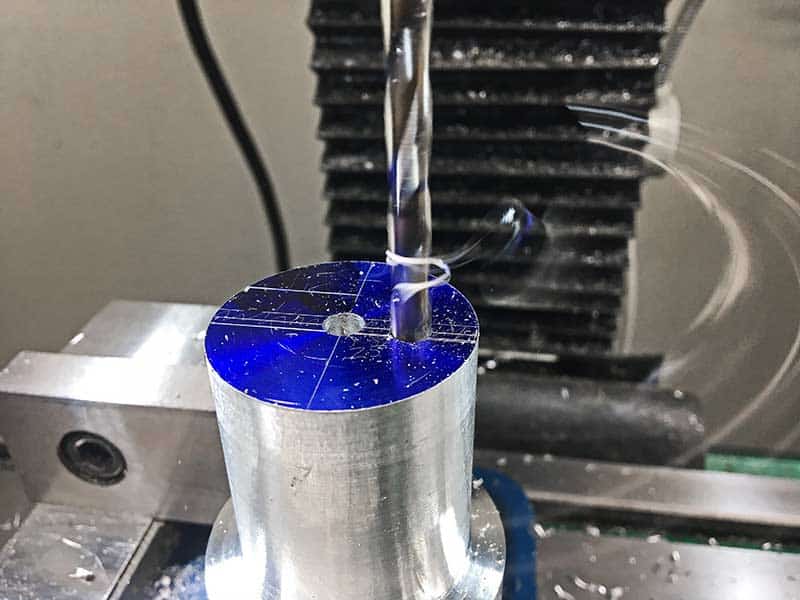
A center hole is drilled in the lathe using a chuck and drill bit held
in the lathe tail stock. This assures the hole is well-centered.
The other visible hole was done on the mill.
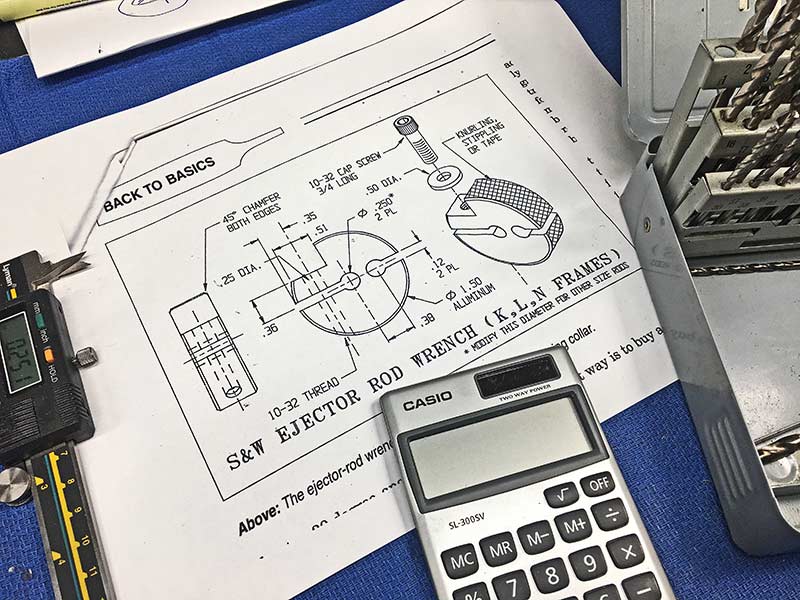
A simple drawing in a gunsmithing tips book caught Roy’s eye. The result is this nifty ejector rod wrench, handy on anyone’s bench.
If you work on revolvers, you know unscrewing the ejector rod can be an iffy proposition at times. First, you can’t recall if it’s “lefty-loosey” or “righty-tighty” since the threads reversed in 1961 for S&W revolvers. Today, they are “left-hand” threads — while prior to 1961, they were “right-hand.” Regardless, aside from tightening when you should be loosening or the other way around, that little rod is tough to get a hold of without destroying the fine knurling on the end.
People try using hard leather under plier jaws, and it mostly leaves leather crud in the now-ruined knurling. I’ve tried lead sheeting, copper and even a sort of hard rubber. Sometimes, if the rod wasn’t screwed in too tightly, it worked. But often, I still ended up with buggered-up knurling. Sometimes, you can chuck the rod in a vise lined with hardwood jaw protectors, allowing you to grab along the length of the rod. But even that doesn’t always work.
Could you buy a tool like this? You bet. But why, when you can make one — and have a good time doing it?

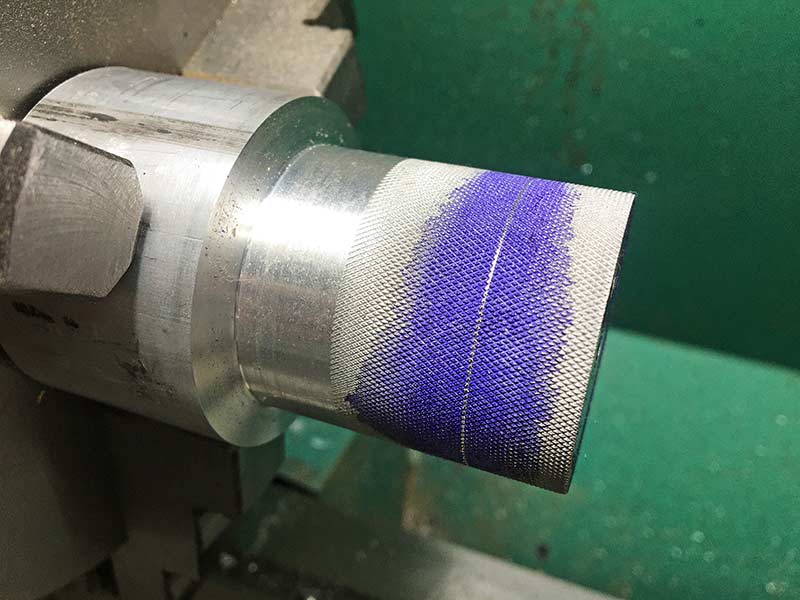
After drilling, the part was set-up for knurling. This texture
allows fingers to get a firm grasp on the wrench to turn the
ejector rod to loosen or tighten it.
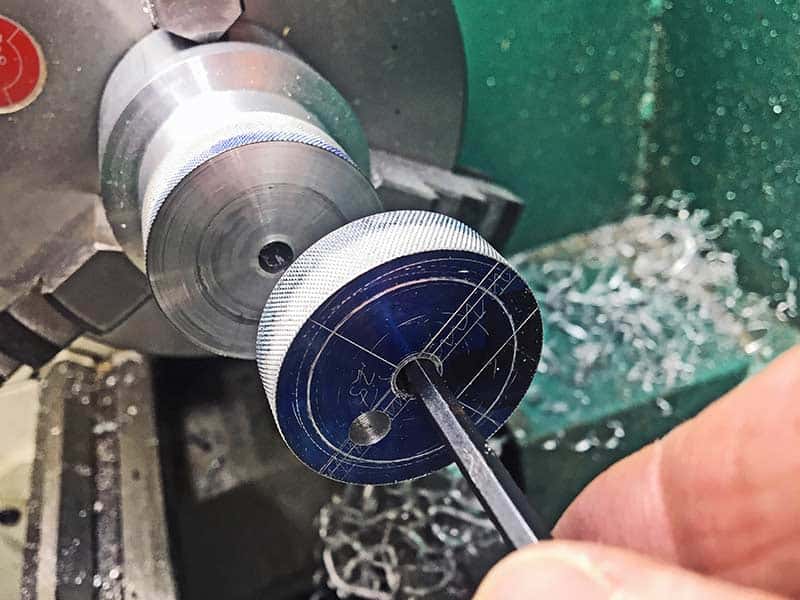
After knurling, some Dykem layout fluid was applied and a mark
placed for the cut-off tool to separate the first part.

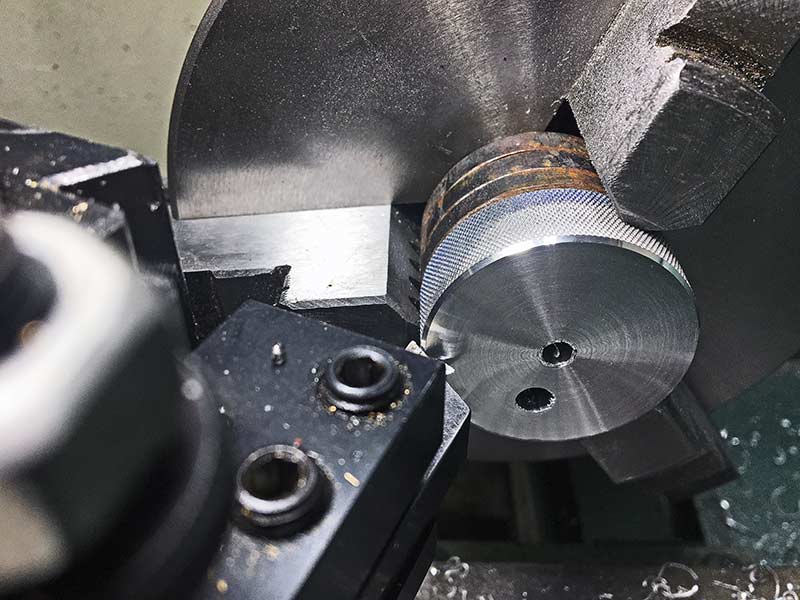
The lathe parting tool sort of "slices" off the part and is
"usually" neater than using a hacksaw!
One tool cut and ready for final machine work. The one behind it
has the second hole drilled through too, it's just hiding behind the
first part. Roy will part that second one off as well.
Using his medium-sized mill Roy drilled the needed secondary hole for a channel he later milled.
To hold the cut paro hold the cut parts in the lathe,ts in the lathe,
Roy stacked washers behind it. ThisRoy stacked washers behind it.
This allowed him to use the lathe to doallowed him to use the lathe
to do a bit of final finishing on the edgesa bit of final finishing on the
edges and chamfer the holes cleanlyand chamfer the holes cleanly..
Starting Out
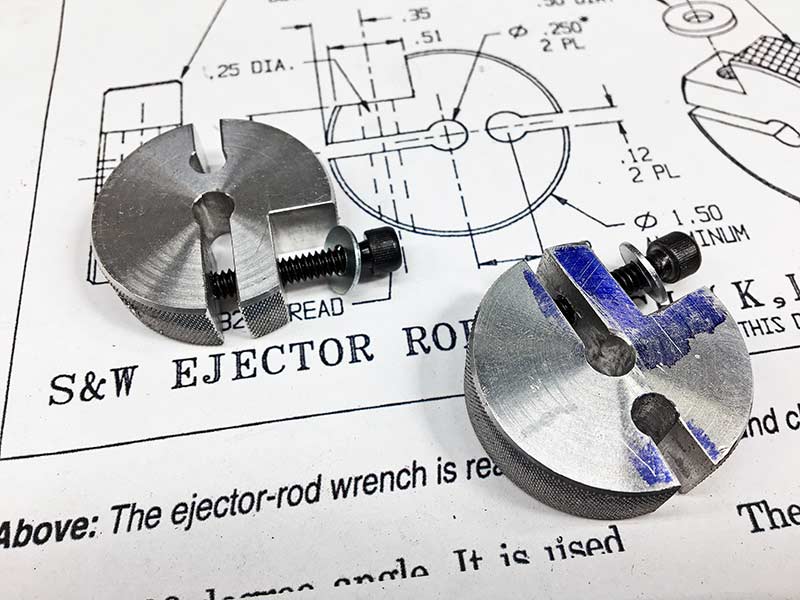
I used a drawing I found in an old gunsmithing tips book I have as the basic design of the wrench. You can easily make it from slightly smaller stock or bigger, but I think aluminum is the best material for sure. I found some nice 2″ aluminum round stock on eBay for about $10. It was a foot long, so it gives me plenty for more projects down the line. I also rounded up some cap bolts and washers I had on hand, following what was recommended in the drawing.
I parted off about a 5″ length of the round stock, chucked it up and turned it to diameter. After taking it out of the chuck, I laid out some lines using Dykem blue layout fluid to find the secondary holes and channels to cut. Using my mill as a drill press, I drilled the end hole for one of the channels, re-chucked it and drilled the center hole in the lathe. It’s easy to find dead center that way.
Keep in mind this isn’t really a precision tool, so these measurements can be within a few thousandths of an inch without causing any undue concern. Follow the drawing to get basic dimensions, but feel free to adjust to suit the materials you have on hand.
More Dykem layout fluid is applied and the final cuts laid out prior
to a trip to the milling machine. Refer to your notes or drawings
constantly so you don't work yourself into a corner you can't get out of.
A milling cutter make quick work of the cutout for the cap screw.
You could file this bit or use a hacksaw if you don't have access to a milling machine.

Cuts are finished and the parts are ready for the relief channels to be milled.
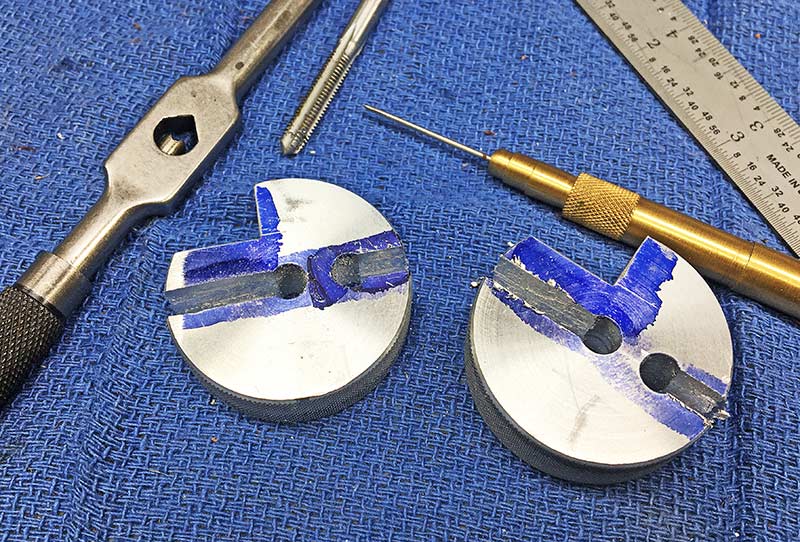
At this point the holes for the bolts need to be drilled and tapped,
the edges smoothed and the flats taken to a 220-grit finish just to look good.
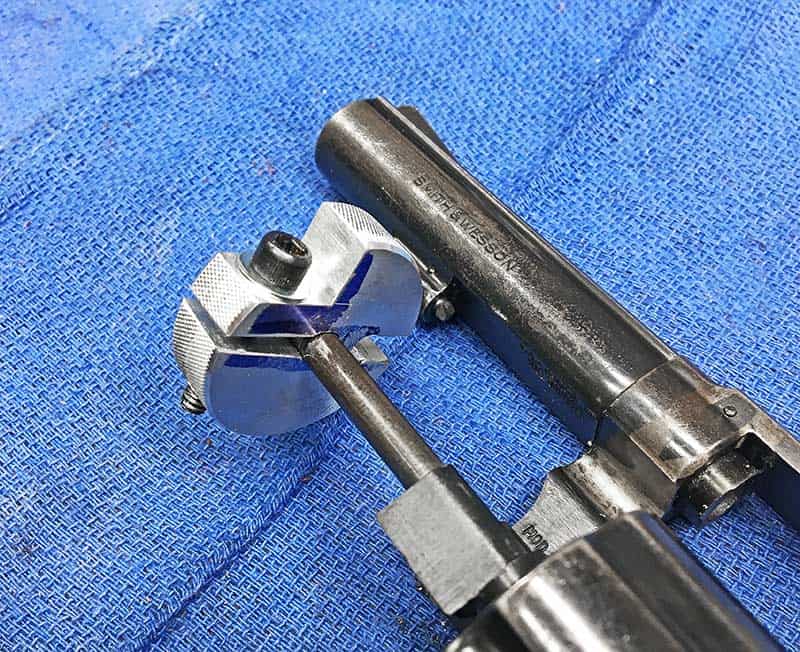
A quick test use before final polish and cleanup showed the
clamps worked just fine. Note how the ejector rod end slips into
the center hole, then as the bolt is tightened the aluminum relief
channels allow the tool to flex, clamping down so the rod can be turned.
More Lathe Work
While the stock was in the lathe, I ran some knurling over it to give fingers purchase on the round body of the wrench to turn the ejector rod. If you don’t have a lathe, you could file some cross-hatching or even just raise some surface burrs to do the same thing.
I used Dykem to mark a cut-off line (I wanted to make two wrenches, at least) and parted the end one off. The parting tool had to stick out a bit far so I took my time. Once the cut was off, I cleaned up the face of the remaining stock for another cut-off. When I drilled the holes, I made sure to drill deeply enough to pass through the second wrench material, too. There is no use in having to redo the layouts for the second one.
Inserting a scribe or, in this case, simply a handy Allen wrench into the center hole allows you to catch the part when it falls off. This sure beats using a hacksaw, trust me.

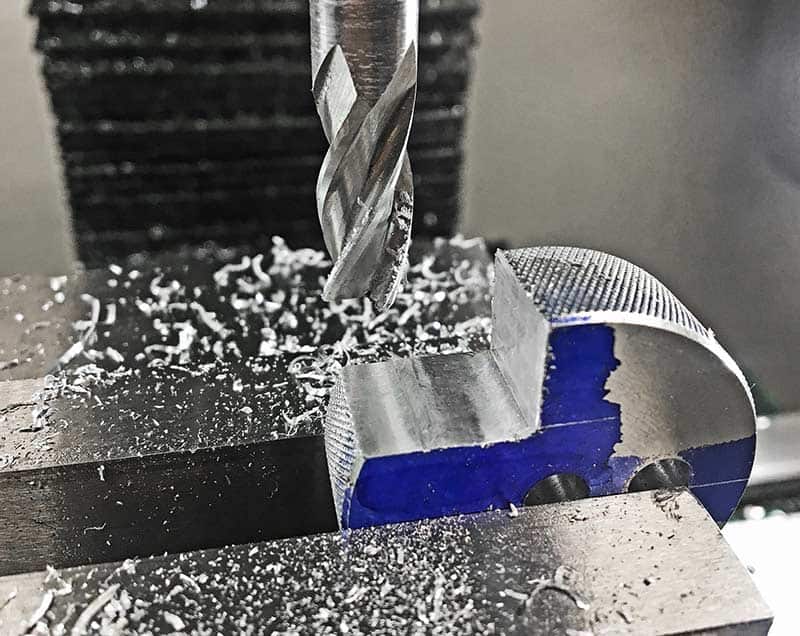
Clamping onto a flat aluminum plate allowed Roy to cut through
the bottom of the part to make the channels through-and-through.
More Layout
At the bench, I put more Dykem (handy stuff) and laid out the channels I needed to mill. You could also use a simple Sharpie-type marker to color the surfaces. I decided to mill the cut-outs for the bolt heads first. If you don’t have a mill, some careful hacksaw work (or a roughing file) will form the same cut. You will find a jeweler’s saw can really deliver some amazingly fine cuts. I’ve often used one to profile-cut a hammer or gun part from a flat piece of steel. They work surprisingly fast and have a very thin kerf. There are loads of them on eBay, which are fine, old German models for around $30 or so.

Roy ended up making one more tool for a total of three from
the original cut of the raw stock. The original stock diameter
was 2" and was turned to about 1.5" for the tool.

A set of simple steel lettering stamps allowed Roy to put his
friend’s name on one for a gift. There’s nothing like a shop-made
tool as a gift for a friend who appreciates such things.

Having the luxury of a good cross-section of tooling helps to make shop-built projects like this go fast.
Careful Mill Work
Chucking the disc in the milling vise was easy since both sides were flat at this point. Since this isn’t a high-precision tool, I just eyeballed the layout lines, assuring the vertical one was aligned with the side of the milling cutter. I ran the quill down to the bottom line and zeroed the depth gauge on the mill. As I cut, once I got to zero I knew I was deep enough. You could also just eyeball it if you like. Once you start to make cuts like this it’s exciting to see a part start to magically appear from the raw stock.
My milling machine is what I’d call “medium” sized, with a one-horsepower motor. Consequently, I take light cuts even in aluminum and use plenty of cutting fluid when cutting steel. A spray of air now and again will keep chips clear and the cuts cleaner. Aluminum is sort of grabby and tends to collect on the cutter’s edges, so keeping things clean helps the cut along. For around $800 to $1,200, you can get a benchtop mill that can do this sort of work, along with sight dovetails and other light-duty milling. Awfully handy in the home shop! Ditto for the lathe.
At this point, we need to lay out the bolt holes to drill and eventually tap and mill the channels to allow the wrench to “flex” in order to grab the ejector rod as the cap screw is tightened. A step at a time, and soon you’re finished.
At the mill, I clamped the parts onto a piece of flat aluminum stock and cut the channels using an appropriately sized milling cutter. This way, I can cut right through the bottom of the part and into the base metal of the flat stock. Slow and steady wins the race. Remember, those channels could have been cut using a hacksaw, power hacksaw or even filed if you had some patience!
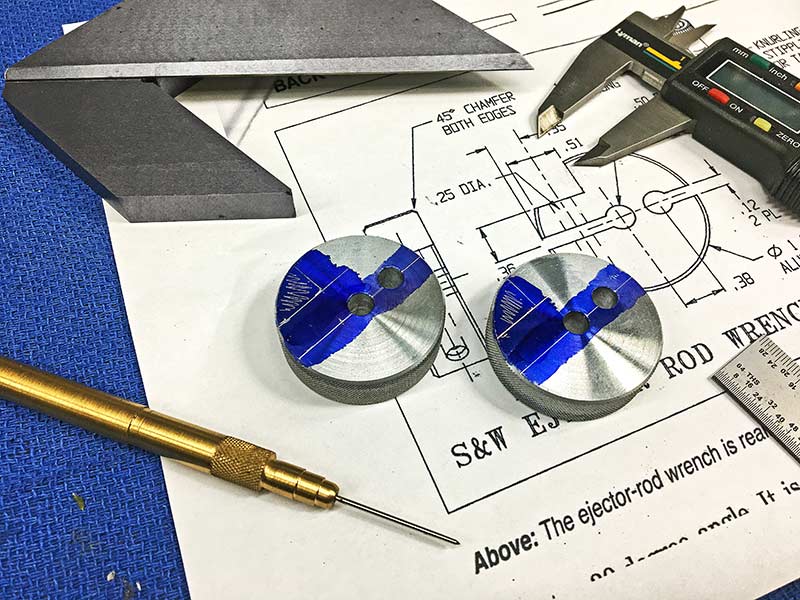
Done, except for cleanup and the final polish to the sides.
Total time invested from raw stock to a test use was about two hours.
Last Touches
I drilled and then tapped the bolt holes using the mill as a drill press again. I tapped the holes freehand, clamping the parts in my bench vise since it’s easy that way, and there’s enough precision for this, even tapping by hand. Then I ran a very fine file over all the edges to de-burr things and put a 220-grit final finish on the flats just to pretty things up. I’ve found tools like this get battered, but at least initially, they look nice.
A bit of acetone or rubbing alcohol will remove the Dykem and degrease things. Then, a final wipe and a drop or two of oil on the threads of the bolt, and it’s time to try things out. You’ll need to do a bit of experimenting to discover how hard you need to tighten the bolt, but you’ll soon find a sweet spot between “not hard enough” and “too hard.” The channel cuts allow the aluminum to flex as you tighten the bolt, clamping around the ejector rod.
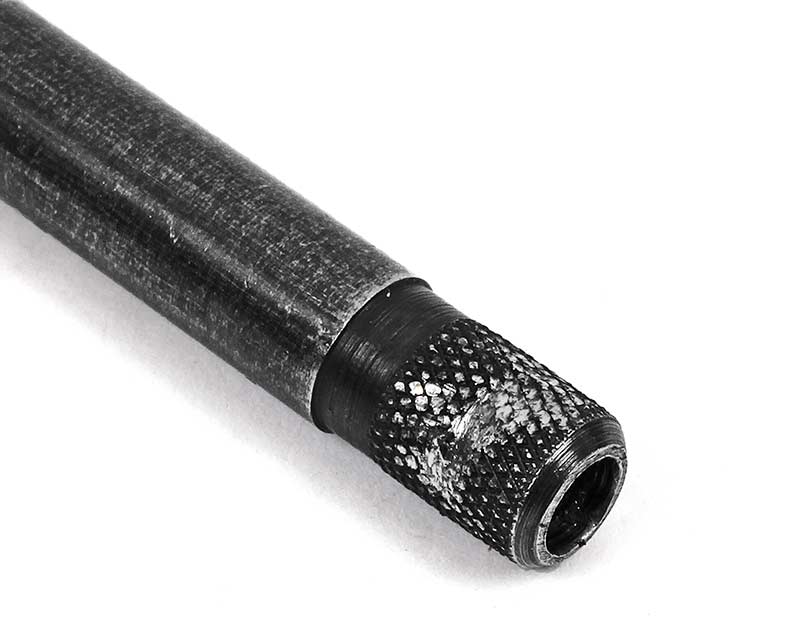
Here’s what you want to avoid — a buggered job with destroyed factory
knurling on an ejector rod. The simple tool made here keeps this from happening.

Over the years, Roy’s accumulated a good collection of various
milling cutters. This is just one drawer full, but it’s really
convenient to have what you need, when you need it!
Final Thoughts
I ended up making three tools and sort of had an assembly line going. I gave one to Tiger McKee (see his Model 10 build in this Special Edition) and one to my friend Dusty (see his .38 Super build here too). Note the simple lettering stamp to make it a personal gift.
Don’t let the sight of a lathe or mill make you think you can’t do this stuff easily at your own bench. I spent many years turning out gunsmithing jobs, projects and building tools as I needed them, all done with hand tools like files, hacksaws, sanding paper, hand taps and dies and various grits of stones for shaping and polishing. I still use many of the tools I made 40 or more years ago when I was first starting out.
The best thing to do? Just do it.
For more info:
www.grizzlytools.com