Revolver Know How
Extractor Rod Secrets

Some pistols, like S&W’s Combat Magnums, come with an underlug to
protect the extractor rod. But, like all other revolvers, the rod is exposed
when the cylinder is open.
Situation: The trigger on your revolver is difficult to press, requiring more force than it should to complete the firing cycle — but only on two or three of the chambers. Or the cylinder is hard to open. You actually have to “smack” it to release and swing it open. Chances are — as long as you’re shooting quality ammunition — there’s a problem with your extractor rod. It’s time to stop shooting and make the proper repairs.
The extractor assembly on revolvers does more than just pull and remove empty brass from the cylinder. The assembly locks the cylinder into the frame and keeps everything in alignment. The extractor rod, actually a tube, is threaded into the extractor and can be bent or become loose. Identifying the symptoms above helps avoid bigger complications. Understanding the cause makes it easier to explain the problem to a gunsmith. Or, with the right tools and knowledge, putting your wheel gun back into spec and functioning properly is a simple task.
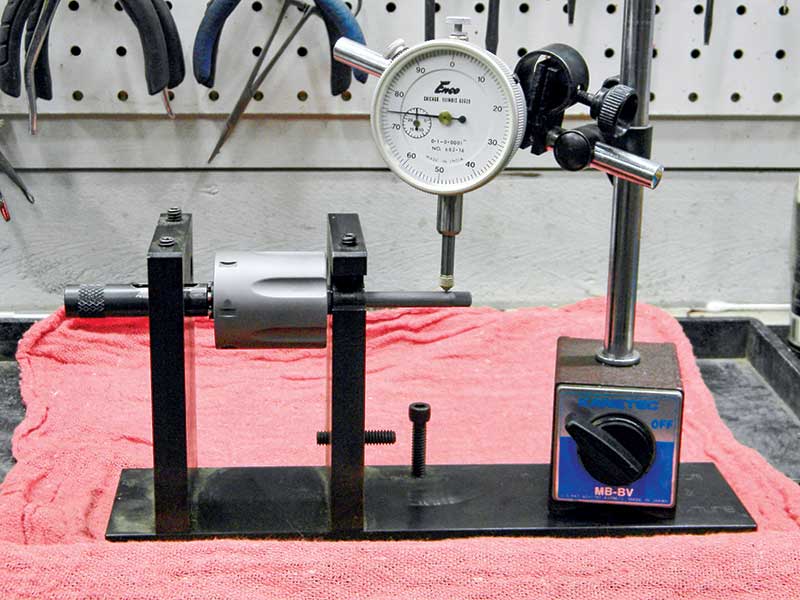
Ensuring the extractor rod is aligned with the cylinder must be done after
torquing the rod and with everything assembled. Grandmasters’ “Extractor
Rod & Yoke Alignment” fixture makes this an easy task.
Diagnosing
I spend my time with S&W revolvers, so that’s the example used here; exact details vary according to manufacturer and design. On an S&W, the extractor rod threads into the extractor and captures the extractor spring, a center pin and spring, and normally a gas ring, which looks like a sleeve. The center pin locks the cylinder at the front of the barrel and in the rear of the window or gate of the frame. Pressing the cylinder latch pushes the center pin forward. The rear of the pin clears the frame, and the cylinder is unlocked to swing open for loading and unloading. The extractor rod assembly must be true and straight with the cylinder and frame for the pistol to function properly.
The extractor assembly is a delicate part of the pistol, and with many revolvers, it’s exposed. (Some pistols have an underlug beneath the barrel to protect the rod when the cylinder is closed.) A bump or drop to the ground, especially with an open cylinder, can bend the rod. The misalignment between the frame, cylinder and front lock increases the pressure required to rotate the cylinder when firing. Normally, unless the bend is severe, you’ll notice this only on two or three of the chambers. A bent rod also makes it difficult to open the cylinder, again, usually on two or three of the chambers.
The rod can also become loose, increasing the length of the assembly. This makes it difficult to open the cylinder on all chambers. Often, the shooter just uses “a bigger hammer,” banging against the cylinder, forcing it free. This will definitely bend the rod and possibly break something else in the process. Regardless of the cause, when firing, if the trigger becomes hard to press or the cylinder requires more force than usual to open, stop shooting.
Obviously, a gunsmith who’s well-versed in revolver affairs can correct the problem. If you’re reading this magazine, chances are you have several revolvers and enjoy maintaining your own weapons. It might be worth acquiring the proper tools and investing some time to perform the work yourself. If not, at least you’ll be well-versed in what’s required. Asking the proper questions can help “audition” gunsmiths for the job.
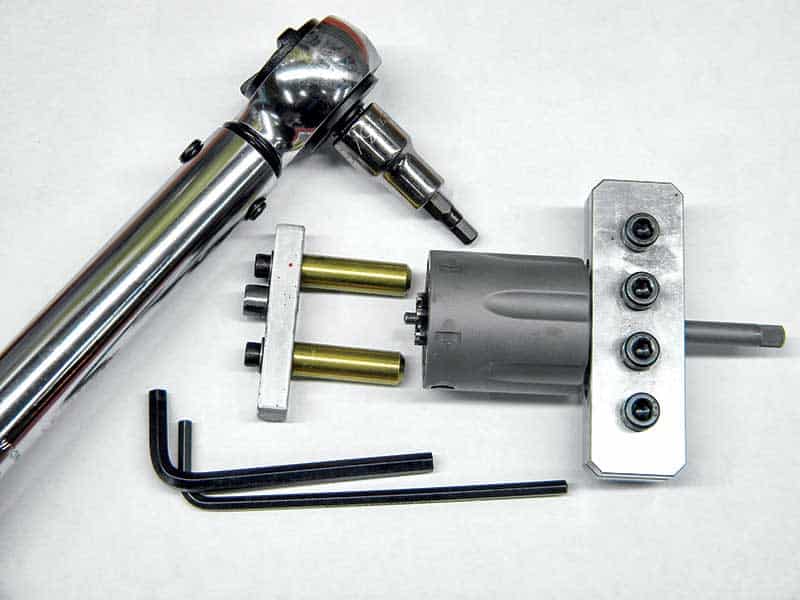
An inch-pound torque wrench is used with the cylinder wrench and
extractor rod wrench to tighten the extractor rod to factory specifications.
If it’s too loose, it can unthread during firing. Go too tight and it strips threads.
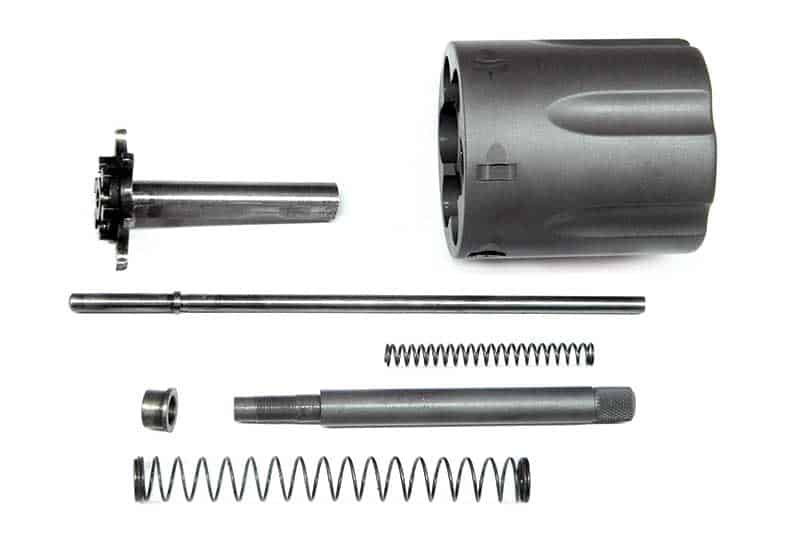
The extractor is at the top, and the center pin and spring are below.
Next is the gas ring — a sleeve that fits over the rear of the extractor rod,
which is actually a tube and the extractor spring. All of this must be centered
and aligned with the frame and barrel.
The Right Tools
The tools needed are specialized and mandatory. First on the list, something every gun owner should already have is the correct screwdriver and bit set. Common screwdrivers for slotted screws are tapered at the tip. They only apply pressure to the top corners of the screw slot. The bit twists inside the slot, damaging the screw head. Gunsmith drivers are straight hollow ground bits that fit the slot tightly and apply force against the entire slot. A bit that’s just a little shorter than the head’s diameter reduces the risk of contact between the driver and the hole in the frame.
An inch-pound torque wrench is used to tighten the extractor rod. The rod must be tight enough that it doesn’t come loose. Over-tightening will strip the threads, requiring new parts. Early model S&W’s have right-hand threads on the rod; later models use a left-hand threaded rod. For tightening and removing, you’ll need a wrench that works for both left and right-hand threads.
An “extractor rod wrench” clamps around the extractor rod. This reduces the chances of bending the rod while tightening or loosening a rod for removal. Do not use pliers or vise grips on the rod. A “cylinder wrench” keeps the extractor from twisting inside the cylinder while tightening or removing.
Straightening a bent rod properly requires performing the action with the extractor assembly installed in the cylinder, so everything is one complete unit. Even if your rod only requires torquing, this action will likely bend the rod slightly. Just a little “wobble” will cause trouble. You’re going to use a setup like GrandMasters’ “Extractor Rod & Yoke Alignment” fixture. They have a video on the ’net showing its use.
If you’re considering working on S&W wheelguns or just “revolver curious,” I recommend Jerry Kuhnhausen’s S&W shop manuals. I have the third and fifth editions. Each one has different information, so get both. Last but certainly not least, make sure you have and use general safety equipment.
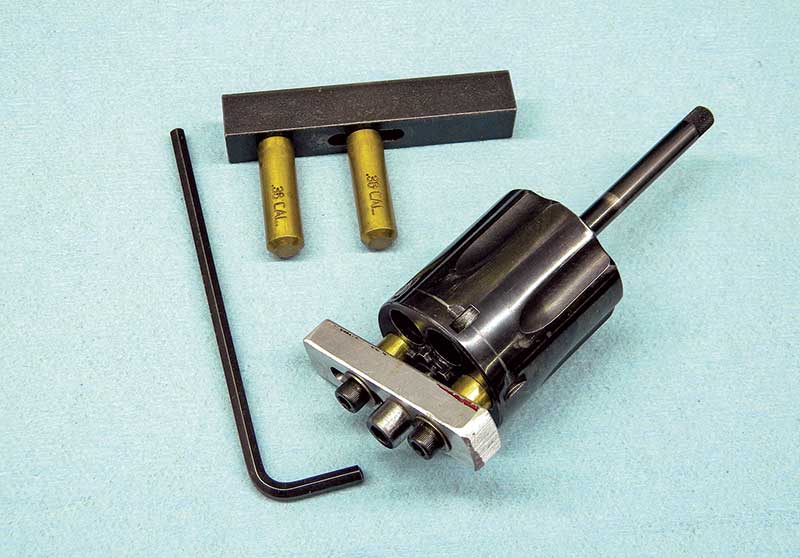
The cylinder wrench has plugs that fit into the cylinder for tightening and removal.
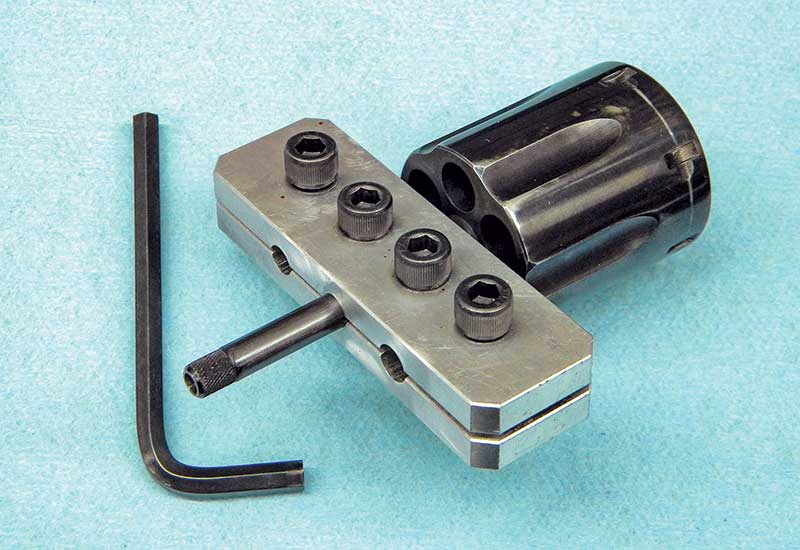
The extractor rod wrench clamps around the rod to hold it tight
when torquing or for removal. This one from Grandmasters works
for S&W J- and K-Frames, plus the Ruger 6.

Jerry Kuhnhausen’s S&W shop manuals are the “go-to” books for working on S&W wheelguns. They have factory specs, plus recommendations on specialized tools needed.
Repair Process
Confirm the pistol is unloaded. Point the muzzle in a safe direction, open the cylinder and position it against a light-colored background. Slowly turn the cylinder while inspecting each chamber. Do not spin it rapidly. Take your eyes off the cylinder, then look and repeat. Also, make sure your work area is clear of all live ammunition.
Start by removing the cylinder assembly from the frame. On S&Ws, it’s held in position by the front side-plate screw. This screw is fitted specifically to your pistol; do not lose it or confuse it with others. Remove the screw, swing the cylinder out and hold it in place while pulling the crane forward to remove it from the frame. Sliding a thin piece of cardstock between the cylinder and frame prevents the two from bumping or scratching while removing the crane. The cylinder is now free. Reverse the order for installation.
Install the extractor-rod wrench and cylinder wrench on the rod and cylinder, and use the torque wrench to check the tightness of the rod. Remember to confirm whether you’re working with right- or left-hand threads.
Once the rod is tightened, the entire assembly is mounted into the alignment fixture. A dial indicator is used to check for straightness as the cylinder is rotated. The fixture comes with a rod that slips over the extractor rod for adjustments. Tweak it, using light pressure, until the extractor rod is within one to two thousandths when rotating the cylinder.
Done. You’re ready to install the cylinder assembly into the frame. Ensure the pistol is unloaded and stroke the trigger several times through each cylinder chamber. Each stroke on the trigger should feel the same. Open and close the cylinder on each chamber, again ensuring it opens and shuts consistently.
It’s always good to know how to maintain your firearms. Using proper techniques during manipulations helps ensure the extractor rod doesn’t get bent. But accidents still happen. Or, maybe the former owner didn’t take care of their pistol as one should. Once you’re familiar with how the extractor assembly functions and how to maintain your revolvers, making repairs is easy and quick. It takes longer to read this article than to perform the work.