Muzzle Crowns:
Be a Square
Simply cutting the forcing cone and muzzle chamfer correctly
turned this Bearcat into a real laser beam of a shooter.
In the May/June 2018 Insider (“The Muzzle Chamfer Challenge”) I wrote about some experimenting I did with an S&W Model 10. I fired groups with the stock muzzle chamfer, then put an accurate 11-degree chamfer and fired again using the same loads. Groups were consistently smaller after chamfering. Since then, I’ve done more experimenting after starting to do some custom Ruger Wranglers.
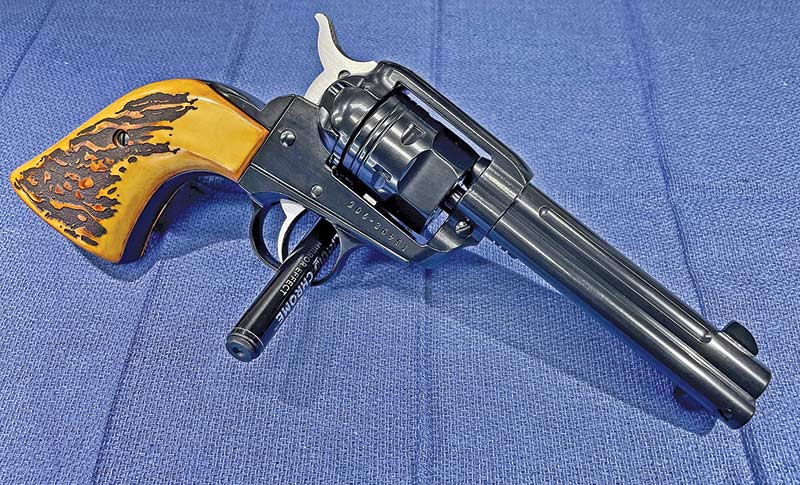
I’ve found stock Wranglers to be pretty much consistent 3″ to 3.5″ guns at 25 yards, depending on the ammo. I’ve done actions, making the trigger pull smoother, lighter and more precise and even that small modification will often improve groups due to the shooter’s ability to be more consistent in the press. Groups often shrunk to the 2″ to 2.5″ area, which I think is about as good as it gets with the stock gun. I’ve also noticed Wranglers seem to have very consistent cylinder throat sizes, sized right for .22s.
I re-cut the forcing cones then and found some modest improvements but not consistently gun-to-gun. The stock forcing cone looks like it was cut with a sharp rock on most Wranglers I’ve looked at, but I’m guessing the .22s aren’t as sensitive to it as center-fire revolvers seem to be.
But, the big change always comes after a trigger job, forcing cone re-cut and a sharp 11-degree muzzle chamfer. The fact I do it at 11 degrees isn’t critical, it’s simply because I have the cutter and arbors at-hand. A perfectly flat muzzle chamfer seems to accomplish the same improvements, but the 11-degree angle does protect the bore-to-chamfer area from abuse from dropping. Once all three mods are done groups will often shrink to the 1.25″ to 1.5″ range very reliably. They do seem to be ammo sensitive and it varies from gun-to-gun. One will shoot great with CCI Mini-Mags, while another will shotgun them. Some have liked standard velocity loads while other don’t, so it certainly pays to experiment with different loads in your own guns.

Here’s a couple of custom Wranglers Roy’s done lately. Attention to proper muzzle chamfers, forcing cones and action work turns these modest guns into great shooters. HS-Custom.com can do this work if you’re interested in having your own Wrangler or other Ruger gussied up. The red one definitely qualifies as a “Red Rider!” Both are done in Cerakote colors.
Here’s a couple of custom Wranglers Roy’s done lately. Attention to proper muzzle chamfers, forcing cones and action work turns these modest guns into great shooters. HS-Custom.com can do this work if you’re interested in having your own Wrangler or other Ruger gussied up. The red one definitely qualifies as a “Red Rider!” Both are done in Cerakote colors.
Is This Legit?
While there seems to be some argument about it, based on my own tests, chatting with accomplished gunsmiths and long-range shooters, and testing from reputable sources I’ve read, a flat, sharp and clean-edge chamfer definitely contributes to accuracy. I’d consider assuring your favorite guns have a good chamfer the same way I’d encourage you to sharpen and really hone a good knife. While the stock edge may be adequate, taking the time to really put a shaving edge on a knife, well, gives you an “edge.”
For me, I use a 1,000 grit diamond stone, then a series of wet-or-dry abrasive papers from 1,500 to 3,000 grit, then diamond paste applied to leather strops (4,000 to up to 12,000 grits). The result is an edge that makes hair pop off your arm. It works great on wood-working chisels too. The reason for the effort though is to make the tool better.
Ditto for your guns. This last bit of attention to the muzzle chamfer helps to “polish the edge” for you when it comes to attaining real accuracy, likely up to the gun’s ability to shoot — with good effort from you, of course.
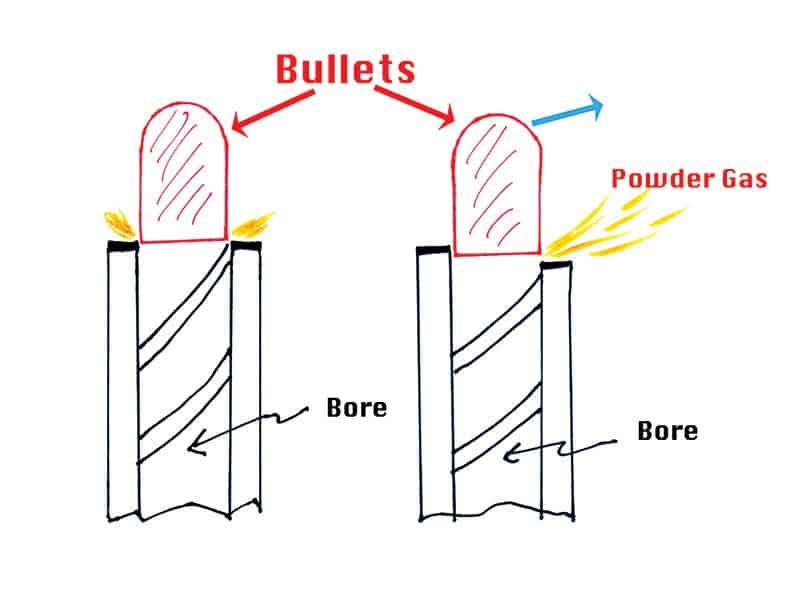
The chamfer on the right is uneven, so the bullet is pushed off to the right (blue arrow)
by gases behind the bullet base still “in the bore” on the left edge.
How It Works
Refer to the bullet drawing image. Okay, I’m not a great artist but this gets the point across. On the left, you see a bullet exiting the bore of a gun with a straight muzzle chamfer. The yellow bits are the gasses escaping around the base of the bullet. If they escape evenly around the base, chances are good the bullet will be stabilized and run true.
Now look to the right. There the bullet is exiting the bore of a barrel with an off-kilter chamfer, one side being a tad lower than the other. As the bullet leaves, gasses begin to escape first at the lower portion, throwing things out of whack.
Try this simple test. Put your phone on the table. Now push it forward by the base using two fingers, one on each end of the base. Now stop pushing with one finger. What happens? The side where your finger is still pushing forces it to the side where the pushing stopped. So when the gas escapes early (in an uneven chamfer), the “pushing” on the base of the bullets stops or is lessened there while the other side is still in the bore being pushed. This “kicking” out may/can/does affect accuracy, depending on the bullet, load, the barrel in question and other variables. But removing at least that variable makes sense, doesn’t it? Then you can concentrate on other unknowns as needed.
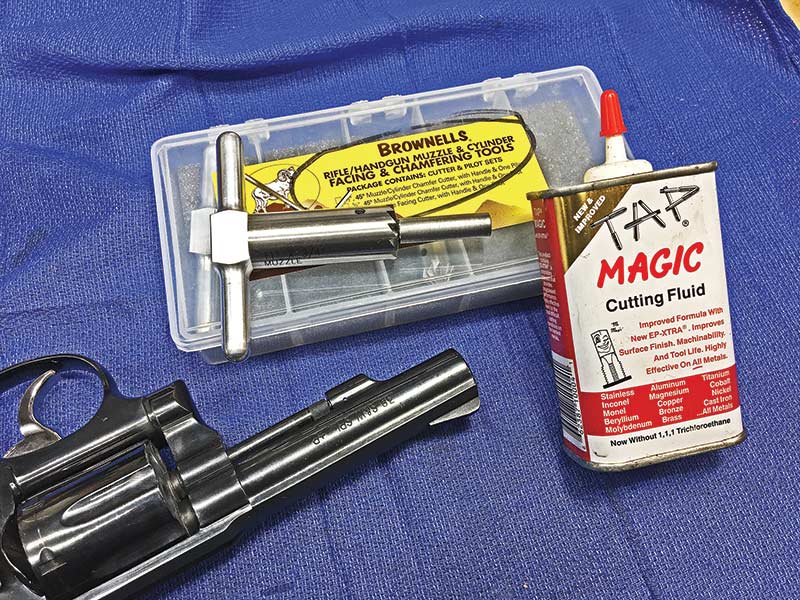
A chamfering tool set (muzzle cutter and arbor for the caliber you like) will allow
you to cut your own muzzle chamfers. The cost might be shared by several shooters.
It’s easy and there are lots of YouTube videos showing you how.
Final Thoughts?
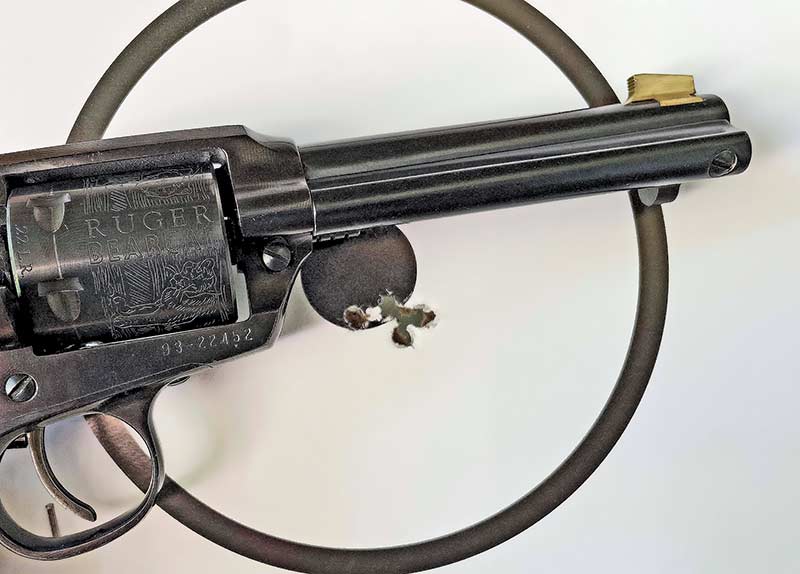
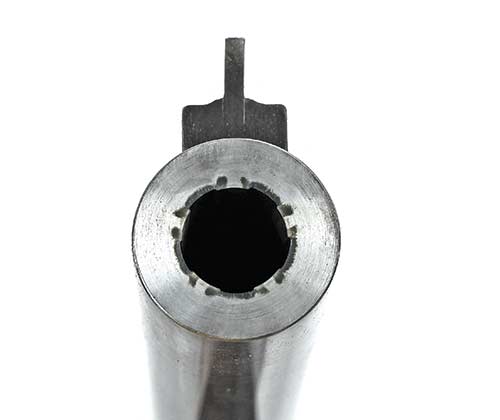
Check out the photo of the muzzle. See how the powder residue is evenly distributed completely around the muzzle? That’s a .32 H&R Magnum barrel I chamfered to 11 degrees. The original muzzle was slightly off and the residue was heavy on one side and lighter on the other. And guess what? It shot much better after the chamfer was corrected. Any decent gunsmith can do this sort of work easily. You can too with some tools from Brownells. If you have questions, drop me a note at [email protected] and I’ll get back to you. I’m no expert, but I did play one in a video one time.