Customizing A Ruger Wrangler
Have We Lost Our Minds?
The base gun is good to go out of the box. They tend toward being a bit
“crunchy” in the action, and the loading gate can be hard to manipulate.
Accuracy tends toward the 3" range, which can be improved with these
tips shown. A modest amount of attention can really turn a Wrangler around.

Roy cut the muzzle and forcing cone chamfers and worked on the
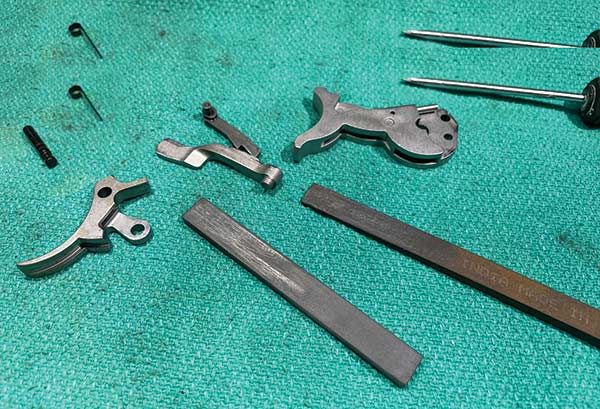
action initially. The right tools pay off. Digital calipers, punches,
high-quality stones, a chamfer kit and a small shop-made hammer
were put to work.
If you’ll be taking the gun apart, use your phone to take detailed pics
and even short videos showing just how things come apart. They’re worth
their weight in gold later. “Oh, I’ll remember.” Nope, because it might be
weeks before you assemble the gun after the work and sending it for coating.

Roy uses plastic bins from frozen dinners and such to hold parts.
This keeps things tidy and safe. Use another one for the “finished”
parts, so you know what needs doing at a glance.
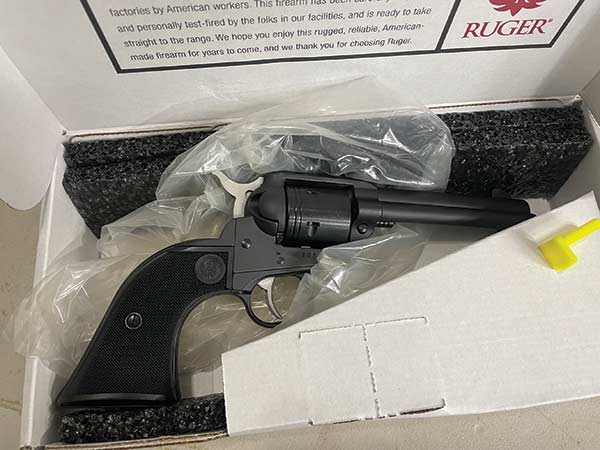
Hitting the “affordable quality” bull’s-eye is a target chased by most everyone who manufactures anything — if they’re smart, that is. Ruger’s launch of the $250 Wrangler single action in 2020 smacked that bull’s-eye dead center. Since then, sales have been strong and legions of plinkers, hikers, casual handgun hunters and anyone needing a rugged “working” pistol were drawn to the Wrangler like a 3-year-old drawn to a plate of Oreos.
I’ve had about a dozen or more Wranglers come through my hands, including the Birdshead models, and while they are all obviously built to a price point, I’d call them “utilitarian” — not cheap. Money normally spent by Ruger on final finish work, forged steel innards and wooden grips is saved, and this savings is passed on to us happy gun buyers.
I was chatting with Hamilton Bowen of Bowen Classic Arms about the Wranglers, and it seems he too finds himself drawn to them for the same reasons we do. How much fun can be had for around the $200 mark at many stores? Plenty if it says Wrangler on it. But Hamilton really got my attention when he said he was customizing one for a client. Huh? What? I confess I hadn’t thought of that — ever. I had taken one, slicked the action up a bit and even re-cut the muzzle crown, but a “full custom” on a Wrangler?
Then I realized it was a great idea. People put $1,500 into a $300 Ruger 10/22 for the same reason. Why not put some time and money into a Wrangler? I suddenly started to look at Wranglers as affordable “base” guns rather than price-point plinkers.
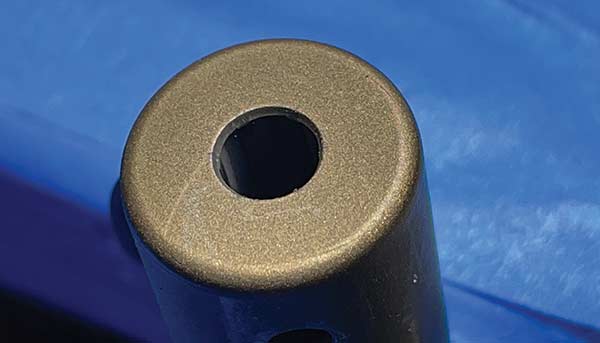
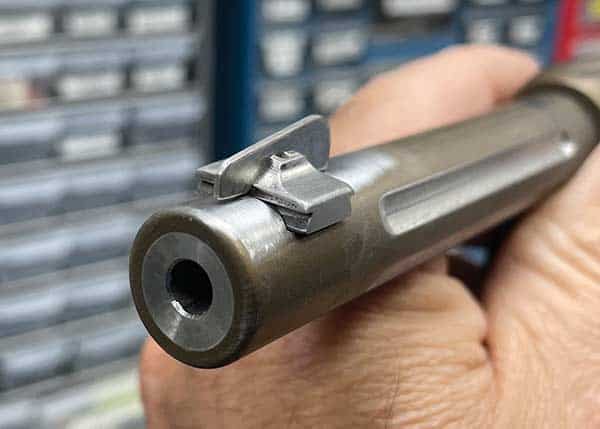
The stock muzzle is fine, but a clean, sharply defined exit for the
bullets is essential for the best accuracy, and there was room for
improvement on the Wrangler. Roy was curious to see how much
accuracy could be improved with a few mods.
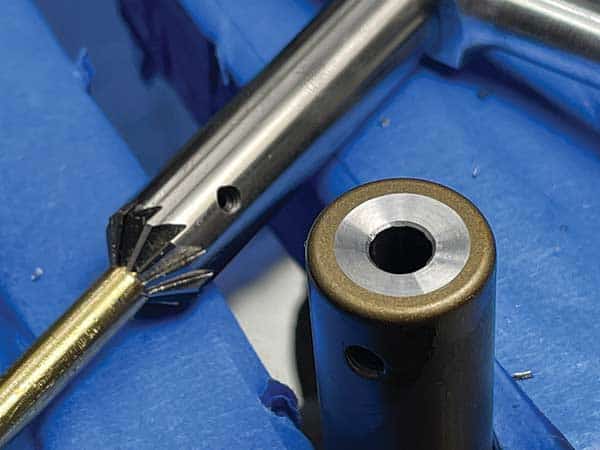
An 11-degree chamfer tool and pilot fitting the .22 barrel soon
had a basic chamfer going. Use plenty of cutting oil and smooth
movements. Eventually, the chamfer got rid of the inner bevel and
squared the exit neatly. See the final photos for the end result.
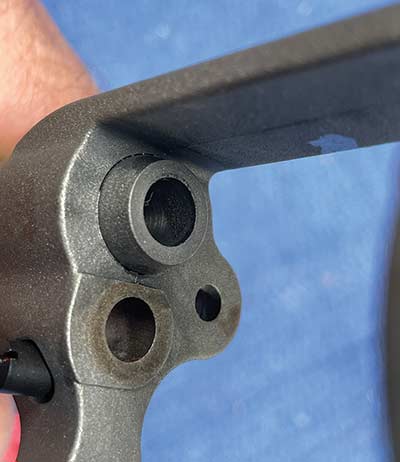
The original forcing cone guiding the bullets into the barrel was
on the rough side. Roy used a chamfer to make the transition
smoother and cleaner.
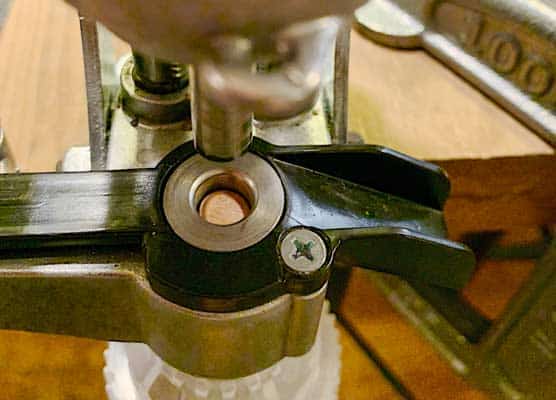
The cutter is placed into the forcing cone and pulled tight with
a rod from the muzzle. Then the cutter is turned lightly to re-cut
the transition area. It doesn’t take much, so go lightly and only
turn the cutter clockwise, or you’ll damage the flutes.
The result is a clean forcing cone and square barrel end. Roy followed
this up with some lapping with the correctly sized brass lap turned just
as the cutter was turned using a rod from the muzzle. Starting at 220 grit,
he then went to 400 and finally 600 grit compound. Likely overkill, the results were amazing.
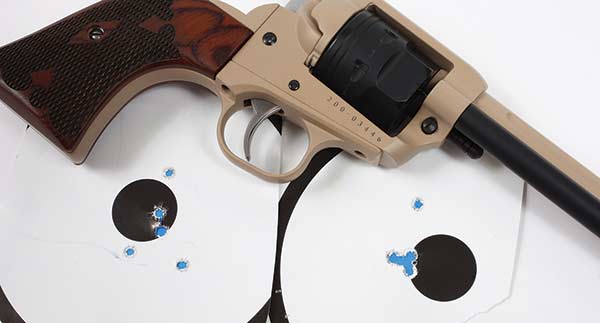
With just the re-cutting of the muzzle and forcing cone
(and better trigger pull), groups went from about the 2" to 3"
range (depending upon ammo) to solidly reliable 1" to 1.5" groups
at 25 yards. Roy likes to think the one odd strike was just a
bad trigger press on his part.
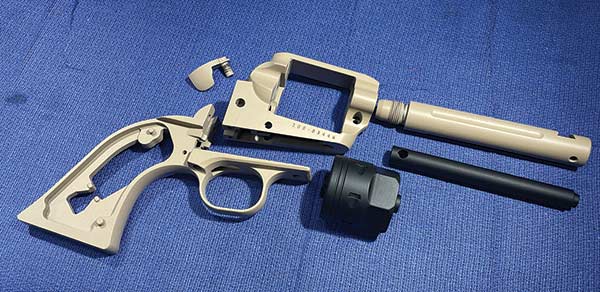
Solid Bones
The Wrangler uses a machined cast aluminum alloy frame, zinc alloy grip frame and hammer-forged steel barrel and cylinder. The action parts are all MIM steel alloy but otherwise mirror the forged steel insides of the more spendy Single Six-style revolvers. The final gun is Cerakoted in silver, black or burnt bronze and, frankly, looks very good. Some limited runs by various distributors have offered other interesting colors, and of course, anyone could do their own gun over using Duracoat or Cerakote if they wanted something unique.
The twist rate of that barrel is 1:14″, and the ones I’ve examined with a borescope have shown sharp rifling. Sights are classic fixed, and the transfer bar means you can carry it loaded with six safely. The coil springs mean virtually no chance of a broken action spring of any sort, and the grip-frame shape offers the ability to take dozens of custom grips offered from the likes of Premium Gun Grips (like those on our sample gun here), Altamont, Eagle and even Ruger, to name just a few.
These mean the Wrangler is “all there” and an excellent base gun to customize. The affordable price also means it’s a great gun for a novice to practice on. You can start with some easy things first, like an action job, and then keep going as your skills develop. Keep in mind what I did to my gun could be done to just about anybody’s single action, while many of the techniques can be applied to a wide range of guns and work done to them. Don’t think of this as just customizing a Wrangler, but more of an idea pool for many of the guns you might have.
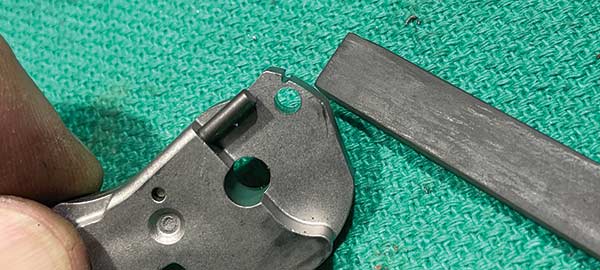
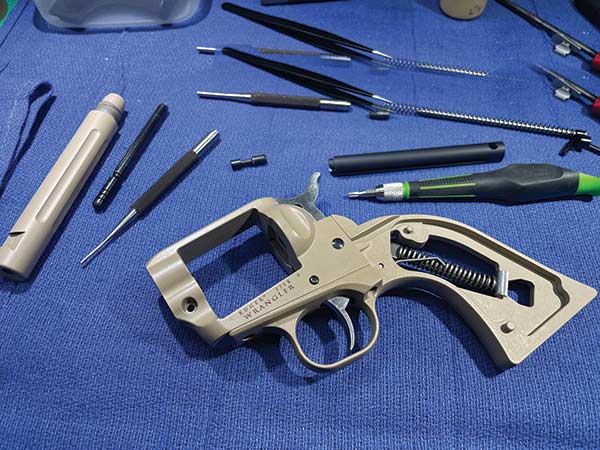
Fully disassembled, the Wrangler is ready for action work. Use hard
stones of several shapes and sizes to polish the bearing surfaces. Keep
in mind you’re not removing metal here, only polishing. See about reaching
into the frame area channels to work out any casting imperfections, burrs or
glitches. Don’t overdo things here — just a few passes with the hard stone
is likely enough.
Sear surfaces have specific angles. If you round them over
or change them in any way, it can affect safety and operation.
Polish — don’t remove metal.
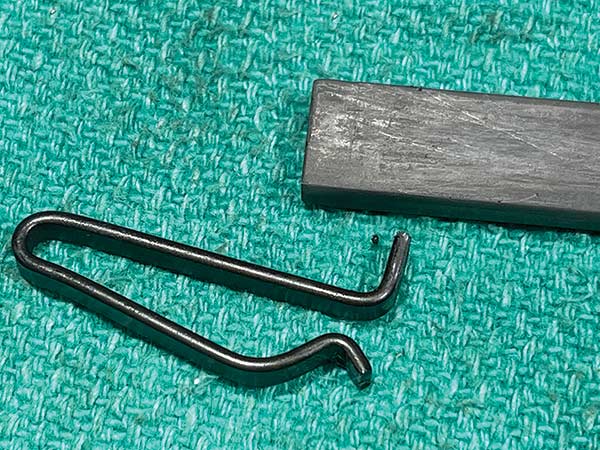
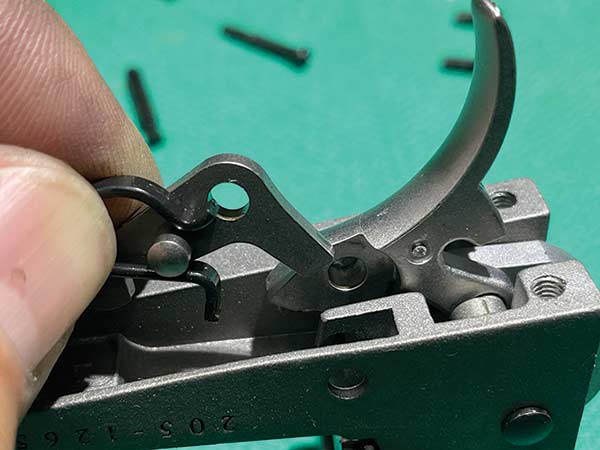
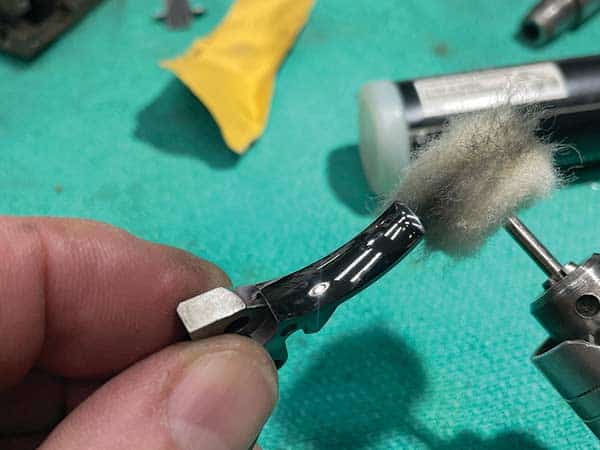
Here’s the loading gate spring. The right-angled bit near the stone
rides against a cam surface on the bottom of the loading gate. Polish
both bits, but don’t change any angles. If you give the spring a gentle
squeeze, you can bend it slightly together, allowing an easier opening gate.
It doesn’t take much, so go easy and try it out. If you bend it too far, the gate
will be sloppy and loose, and you’ll need to bend it back some.

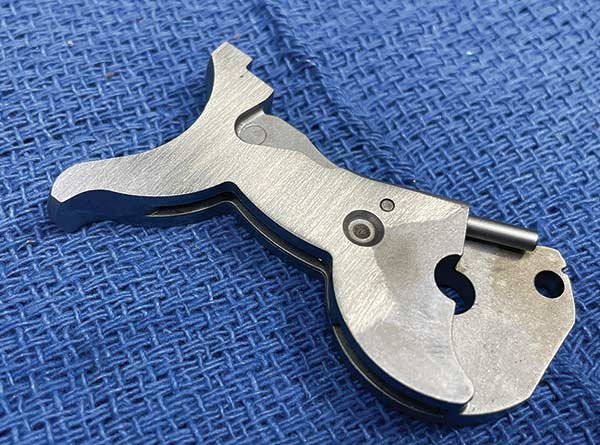
MIM parts are fine, but the flat sides of the hammer and trigger were
wavy, so Roy flattened them using a flat aluminum sanding block from
Harrison Design. You can use a flat metal plate, glass or anything similar.
Start at 180 grit and go to 220 for a nice, satin look. You can see the
flat area starting to form here.
There’s no need to do the entire side as much of it is hidden
when installed. This takes some time but is well worth the
effort when the final finished gun is assembled.
The Tools
I’ll admit right off I used a medium-sized milling machine, a lathe and related tooling (cutters, clamps, indicators, etc.) as part of this build. But I also used a wide range of hand tools like files, stones, wet-or-dry abrasive papers, gunsmith screwdrivers, muzzle and forcing cone cutters, a Foredom tool (like a Dremel), diamond hones and various cutting fluids, lapping and polishing compounds and lubricants. I also used other tools like picks, a small level, borescope, vise, canned “air” to clean chips away, a magnifying visor, torque wrench and other tools I’ve collected over the years.
But don’t let any of this scare you away. A few good files, screwdrivers, wet or dry paper, a few hard stones for action work, a modest vise and a clean, well-lit place to work can get you going. As you find yourself wishing for a particular tool to accomplish a job, then you buy that tool. They’ll gradually accumulate, and pretty soon, you’ll have a 25-foot workbench as I do!
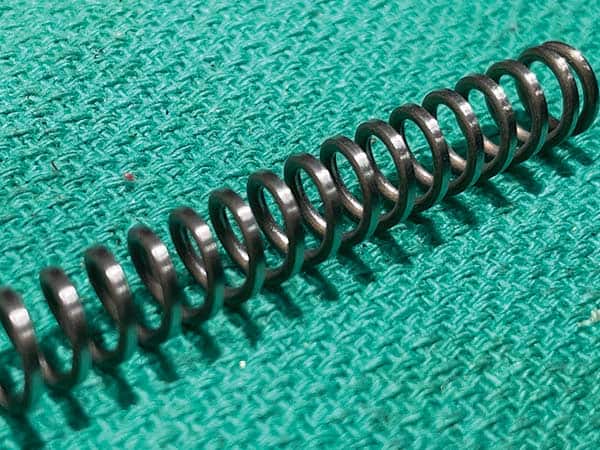
The hammer spring can stand with some thinning to lighten it.
Don’t clip coils on any spring, as that changes the dynamics. Note
how the spring coils are slightly “flat” in the photo. Slip the spring onto
a metal rod and touch it against a spinning belt sander to reduce the diameter.
Don’t go too far, and don’t overheat things. Just flatten it a bit and try it.
Polish the guide it rides on too.
Roy likes a smooth, polished trigger face, so use 220-, 400- to
600-grit paper, then finish with a polishing wheel and some rouge.
A mirror finish is easy to manage and not only looks great, but it
also allows your finger to slide over the trigger as you press.
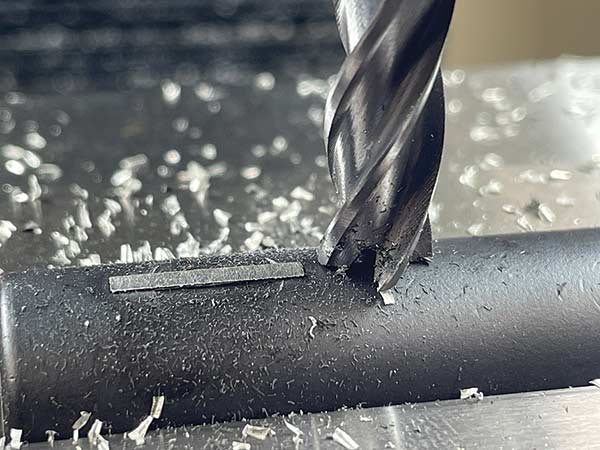
A traditional-looking dovetailed front sight was part of the plan,
so the fixed front had to be milled off. You could do this with files —
including cutting the dovetail — but a milling machine and cutter make it a lot easier.
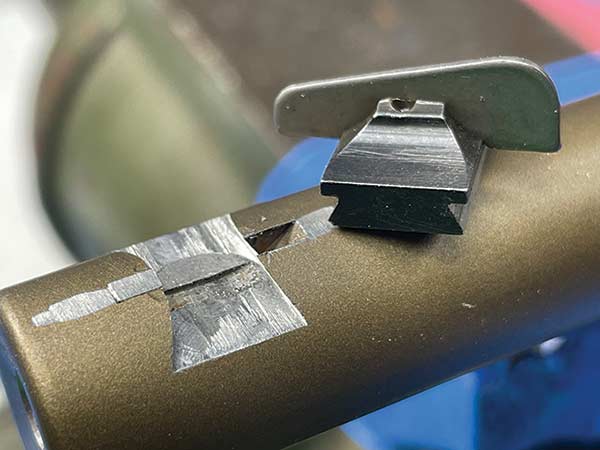
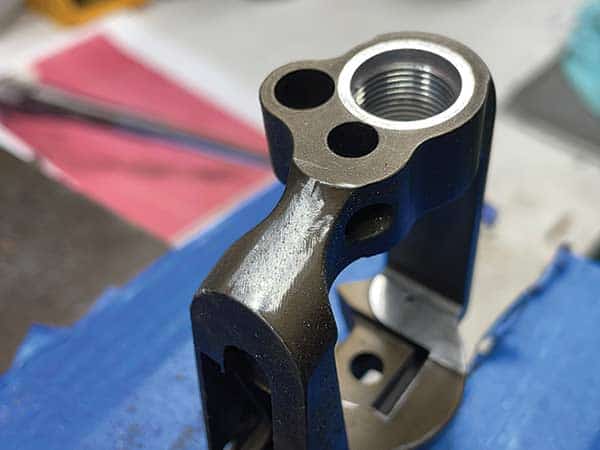
Milling the dovetail left small bits of the front sight metal in a
groove where it had been press-fit into the barrel. Roy had to clean
this out and eventually filled the holes with JB weld, dressing it
down for final Cerakoting.
Preliminary fit-up revealed everything fitted fine. Note barrel had
been fluted by this time and Roy was doing the final assembly and finish work.
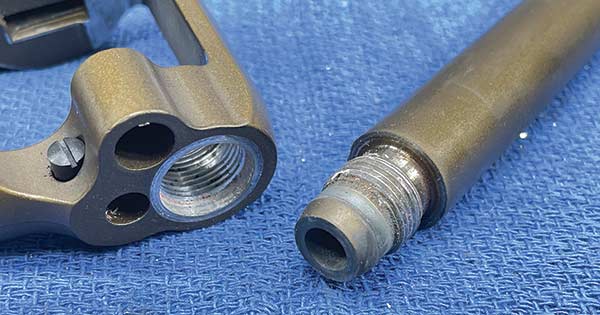
Prior to fluting the barrel in the mill, the barrel had to come off to
make things manageable. Roy found it unscrewed surprisingly easily
and was held on with some sort of Loctite or glue. Wrapping the barrel
in 220 grit paper and locking it in the vise allowed him to unscrew the
frame easily with the “hammer handle through the cylinder cut-out” method.
The Build
We’ll do this as a sort of step-by-step process so just follow the photos along, and they’ll be in rough order. Keep in mind much of this is more “just to show you” the steps than a detailed how-to-do-it. When I say, “I set up the cylinder in the rotary table,” there’s a lot of dialing-in and indexing, making sure the parts are clamped correctly, milling table square and locked, etc., which we don’t have space to go over. Fortunately, there are thousands of YouTube videos and resources online if you have specific questions about some details.
Feel free also to skip steps as needed. You can ignore the portion on cutting the flats on the cylinder, for instance, and go right to another step if you like. Most custom work shown can be done as a standalone modification. Also, I was working on black and burnt bronze guns, so you’ll see both colors in the steps.
For more info:
PremiumGunGrips.com;
Brandon’s Gun Trading Company (Cerakote): (417) 623-8787; Brownells.com (for tools);
HS-Custom.com
(Custom Wrangler work)
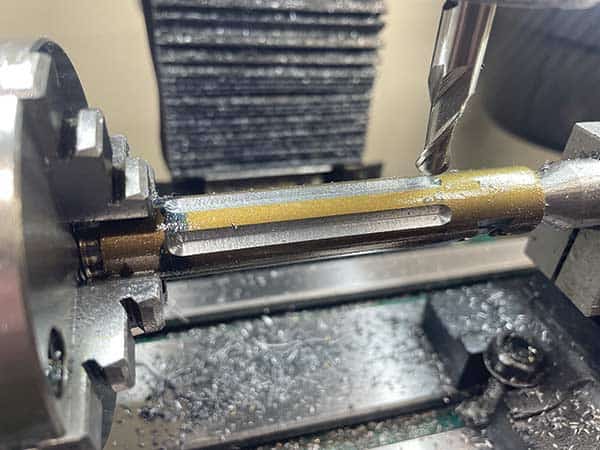
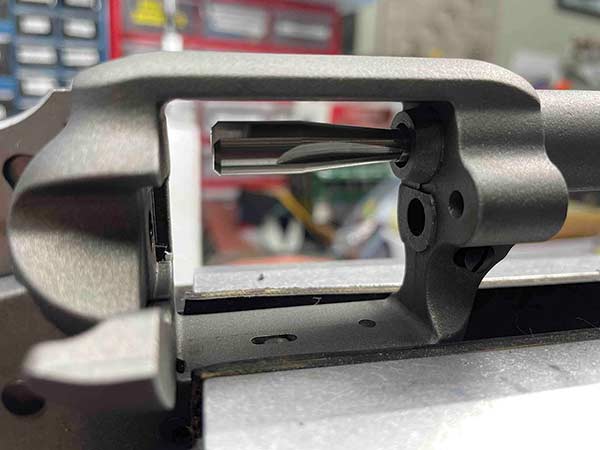
The basic setup on the mill is a rotary table side-mounted to
hold the barrel and a tail-stock for the muzzle end. Once things
were dialed in, Roy used a ball-end mill to cut flutes, indexing the
rotary table 60 degrees at a time. He didn’t cut a flute where the
ejector rod rides.
Roy used a side-cutting milling bit made specifically for grooving
the other barrel. It cut a bit smoother and was easy to setup. He’ll
do it this way in the future, but it was interesting figuring out the
two setups. He kept the stock sight on this barrel.
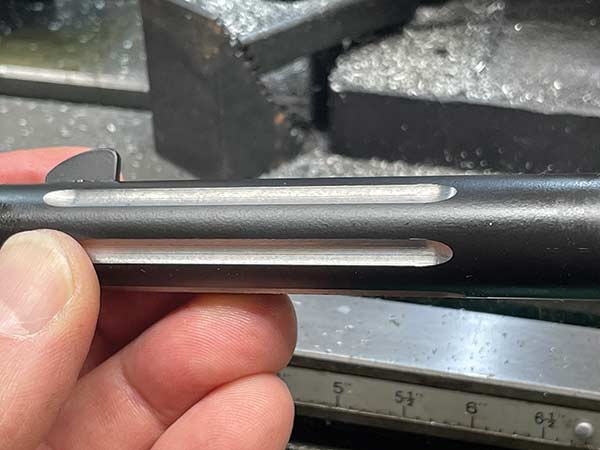
The flutes needed very little handwork with abrasive paper
to clean up. It lightens the gun some — and looks cool.
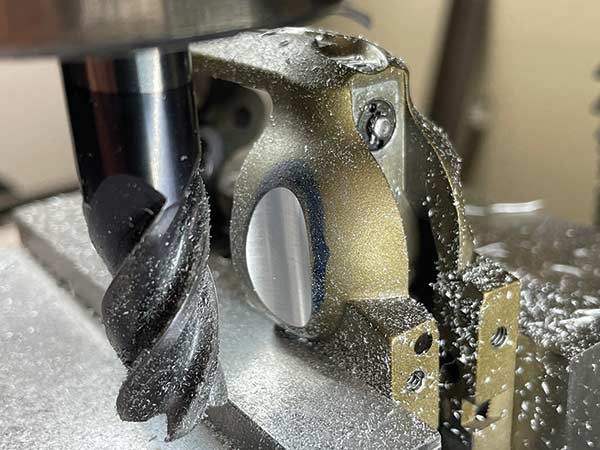
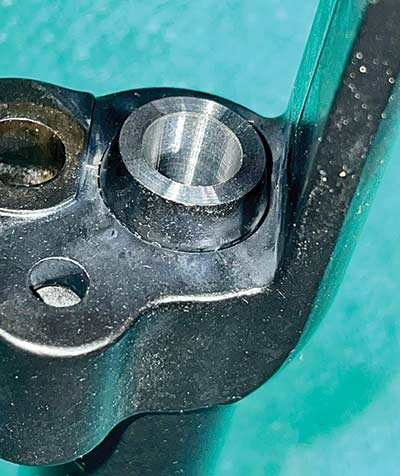
Roy’s always admired the flutes Hamilton Bowen puts on
custom guns, so he did something similar to the Wrangler
recoil shield. A large end mill turned slowly did the trick.
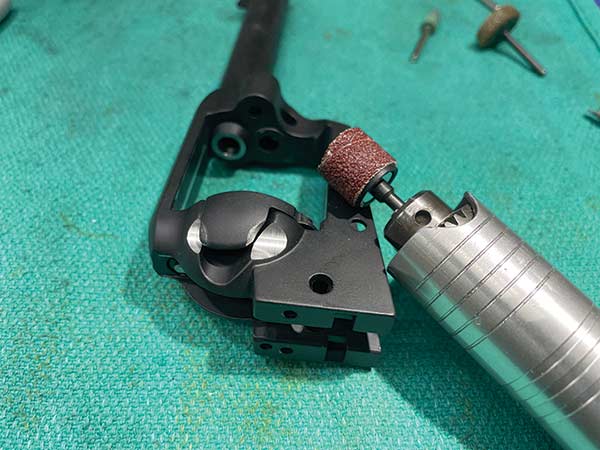
Roy reshaped the loading gate with a Foredom tool to make it
easier to open and also fluted the recoil shield on that side of the
gun a bit, too. Along with lightening the gate spring, the result
makes it easy to open the gate to load and unload.

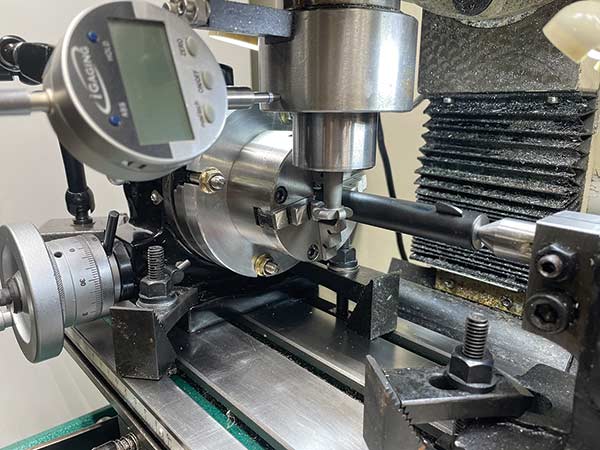
Roy took plenty of time dialing in the rotary table and aligning the
ball end mill. He used the side of the mill for the flats and the ball
end portion put the transition at the bottom of the flats. After each cut,
Roy rotated the table 60 degrees.
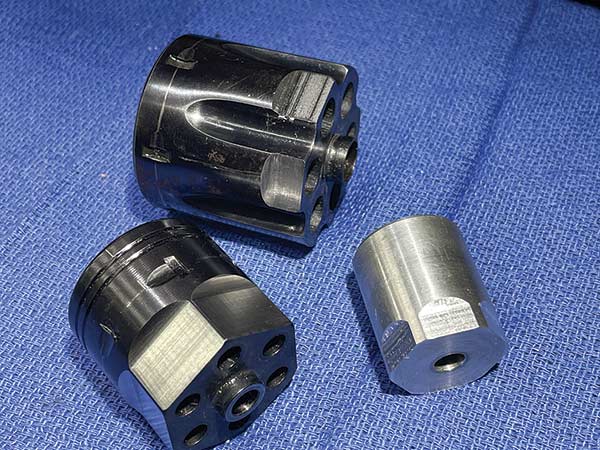
Roy wanted flats on the non-fluted cylinder to cut weight and for looks.
He experimented a bit with a junk cylinder from an imported gun and a
piece of round stock until he got what he wanted. Then he took the leap
of faith and worked on the real cylinders.
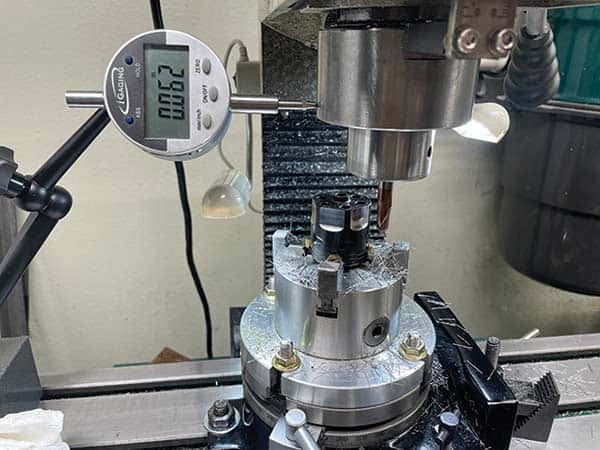
The setup worked great and the results were pleasing. The digital
indicator here is set up to allow a consistent depth of cuts on the flats.
Note the long, thin chips from using the side of the ball end mill
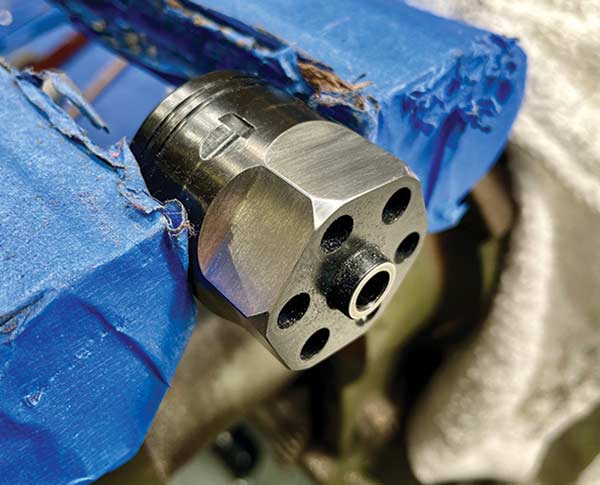
oy chucked the cylinder in his lathe to chamfer the edges,
then polished the cuts to 220 grit for a nice, even look. Some
people seem to really like this look, while others ask why he didn’t
just cut normal cylinder flutes. “Why be normal?” is Roy’s answer.
One of the final jobs was to carefully work out any casting lines
or imperfections using fine files and abrasive paper grits. The
Cerakote shop said to take it down to 220 to 300 grit as a final finish.
They would then do a light sand-blast to even things out. This step
removing the casting lines made a huge difference in the final look of things.
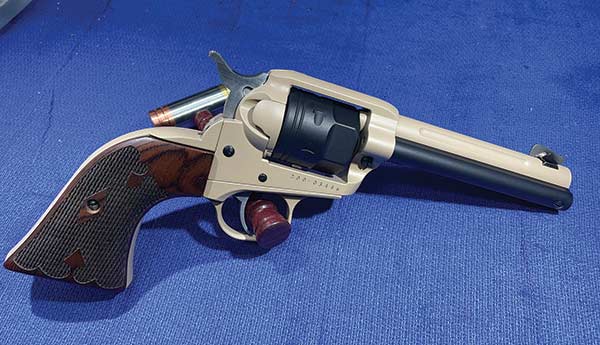
Ta-Da! Grips are from Premium Gun Grips, and a set of custom
grips really spices things up. Some like the two-tone look, some
don’t, but Roy does, and since it’s his gun, that’s what counts.
It’s very satisfying to have a project like this where you did the
work yourself. You could easily do this same sort of thing and
simply leave off the fluting. The rest would still make a handsome,
smooth operating Wrangler. HS Custom in Joplin can also do this
work if you’re not game to tackle it yourself.
Back from the finishing shop (Brandon’s Gun Trading Co.
in Joplin, Mo.) and ready to go together. Now’s when all those
disassembly photos you took will earn their keep.
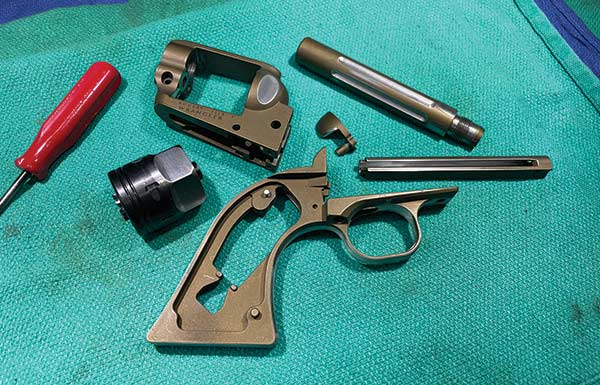
Here are the main bits ready to go to the finisher. Roy took
the time to polish the inside of the ejector rod housing, the
breech face and even used JB Weld to fill some tiny casting
pits on the bottom of the grip frame. It was well worth the effort.

A left-side view showcasing the flutes and front sight. You could
easily adjust the length of the flutes (longer on the sides of the sight,
\shorter underneath the barrel), change the style of the front sight or
make other changes to fit your mood.
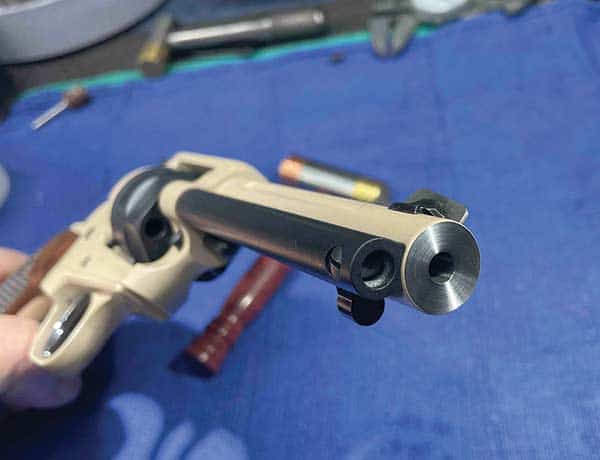
Roy finish-cut the muzzle crown to clean the Cerakote off and give the
muzzle some eye candy at the same time. It’s also easier to clean fouling
off the muzzle on bare steel and makes the wear on any finish there a non-issue.
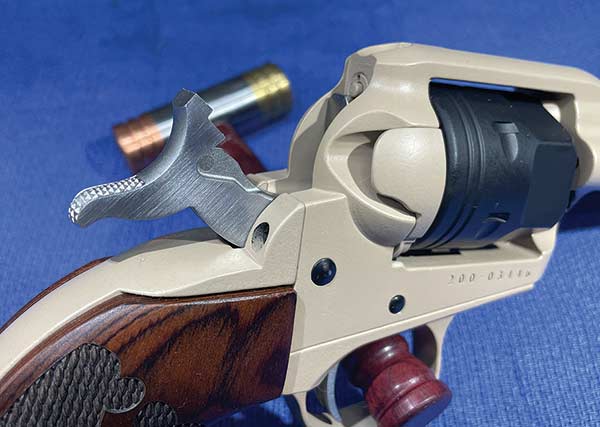
Note how the finished hammer sides earn some style points here.
The reshaped loading gate works great, too. The black pins add a
bit of contrast, while the cylinder flats give your eye something to ponder on.
Take your time and be aware you may have to remove a bit of
coating here or there to get things to fit. Lube as needed as it
goes together, and don’t force anything. The pins can be fumbly
but don’t be tempted to pound them in. They’ll slip in; you just
need to get things aligned “just right.” It’s exciting to watch it take shape.
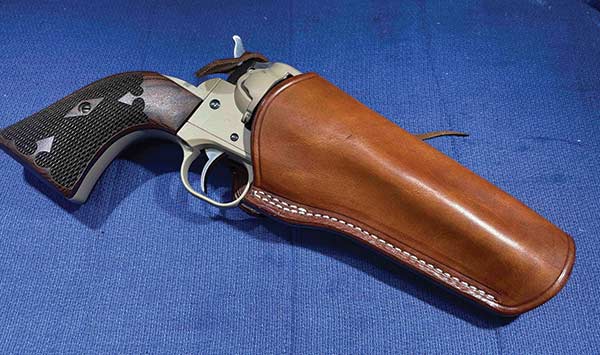
Here’s what it’s all about. The “new” Wrangler at home in a Thad Rybka
field holster is ready for a day on the tractor, hiking, hunting or just sitting
on your desk to be enjoyed. Remember, you can start with simple jobs like
an action job and become more adventurous as your skills build. But don’t
be askeert to give it a try.