DIY Revolver Modifications
Revolvers are great weapons for self-defense. They come in a variety of sizes, are generally more accurate than we can shoot them, plus, they’re available in effective Magnum rounds. A well-maintained revolver is more reliable than a semi-auto. If you don’t provide the resistance required for the slide to cycle, eject and chamber the next round, the semi-auto will malfunction. Revolvers are dependable even if you don’t have a perfect grip or firing position. During a close-quarters struggle, there’s a big chance of the pistol’s muzzle pushing against the threat’s body. This forces the semi’s slide out of battery; it will not fire. Not so with a revolver. Yes, semi-autos can hold more rounds, but for self-defense, as long as you perform properly, the wheelgun’s “limited round capacity” isn’t usually an issue. But, as with all firearms, there are a few modifications that make revolvers more efficient. Most are perfect DIY projects.
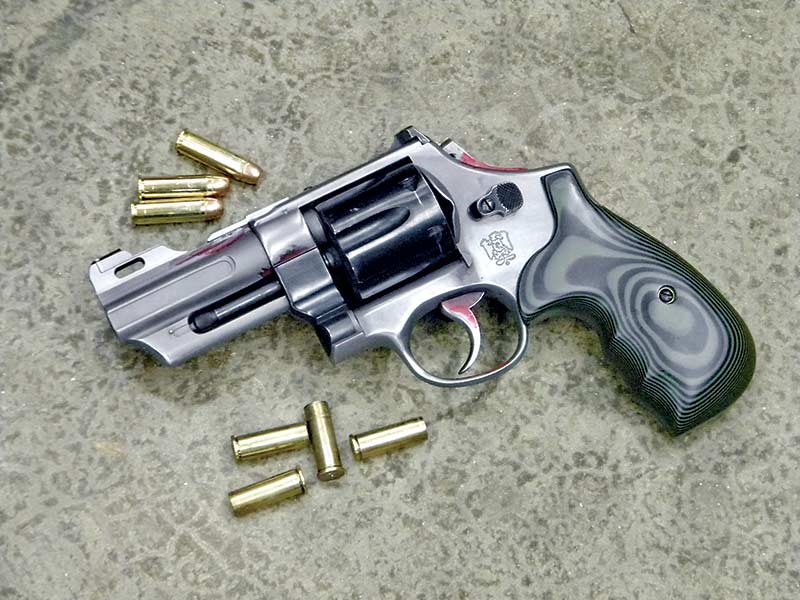
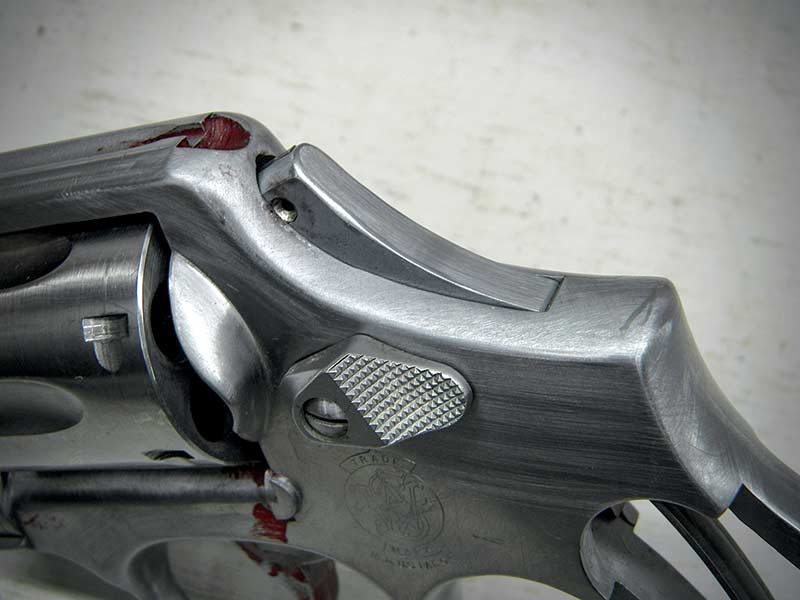
Adding a third lock to the crane provides a more
positive lock-up for the cylinder.
Stocks
One of the easiest modifications to a revolver, the one almost everyone needs to perform, is replacing the stocks. (People call them “grips,” but the stocks attach to the pistol’s grip.) The right size and shape stocks transform a revolver from an object you struggle against that’s painful to fire into an extension of your hand and a pleasure on the range.
Stocks come in all shapes and sizes, compact for concealment and larger for “shootability.” You can get in wood, synthetic, rubber, horn, antler and about every other natural or man-made material. Some have finger grooves, while others are more linear. The surface can be checkered, smooth or have a stippled finish.
I prefer symmetrical stocks. The left side stock is relieved for loading/unloading the cylinder. The right-side stock on some designs doesn’t have this cut. For shooting with both right and left hands, ideally, each side should match. With my hand size, I prefer “open-back” stocks that don’t cover the rear of the grip. I stipple the rear of the grip, using a craft-type engraver, for additional traction.
Another option is the Tyler T-Grip or similar accessory. This adapter goes against the front of the grip and is held in place by tabs that go underneath the stocks. These adapters completely change the way a set of factory stocks feel. They also look very “retro,” which is a plus.
You’ll end up testing and evaluating several stock options before discovering the right fit. The discards are great for selling online; one person’s “reject” is another’s “perfect.” After deciding what’s “best,” you may realize the stocks need a little fine-tuning for “perfect.” Every set of stocks I use for carry has been sanded and reshaped to fit my hands. Don’t stop experimenting until you’re completely satisfied with the fit and feel, especially when firing and manipulating the pistol. There are so many stock options that, eventually, you’ll strike “gold.”

With a small milling machine, you’re only limited by the
imagination. This Model 28 S&W has a fixed rear sight
plus a custom base with protective wings to hold an
XS “Big Dot” front sight.
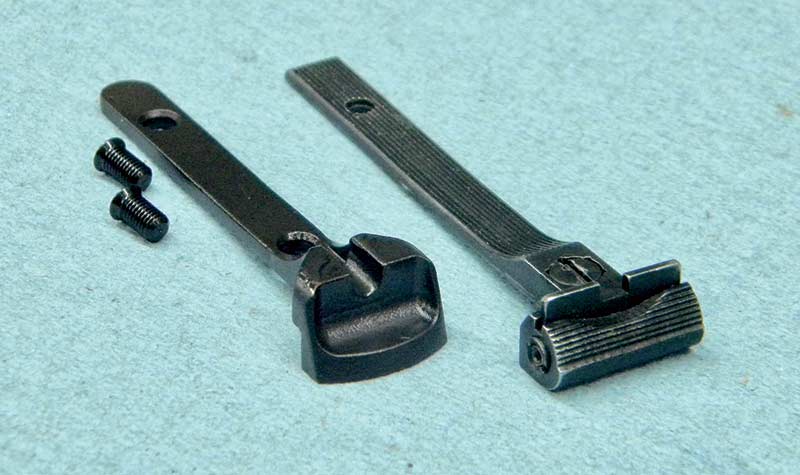
Adjustable rear sights are easily damaged during hard use.
Sights
A defensive pistol must have a set of sights that work under all conditions, especially in low-light situations. They should allow you to instantly acquire a sight picture on large, close targets and provide the precision needed for surgical and long-distance shots. If your revolver didn’t come equipped with such from the factory, it’s something that needs correcting.
Sights come in a plethora of styles, although choices may be limited according to what type of revolver you’re carrying. Some pistols have dovetails cut into the frame and barrel for the sights. “Pinned” front sights are common with revolvers. “Fixed-sight” pistols have sights that are part of the frame and barrel. In the past, gold beads were popular; today, it’s mostly fiber optics and tritium.
Dovetail sights are easy to remove and replace. This can be done with a hammer and a nylon or synthetic punch, which avoids marring the metal. (If there are any locking screws, make sure to loosen them first.) Pinned sights normally require drilling a hole in the replacement sight for the retaining pin. With care, a hand-held drill will work, but a drill press or milling machine is best. Position the sight in the barrel, drill from one side to about halfway through, then flip the pistol over and drill from the other side. This is more forgiving than trying to drill all the way through from only one side. To avoid damage, determine what type of pins you’re working with and use the appropriate roll-pin or a cup tip punch.
Modifying a fixed-sight pistol requires some metal removal. I install XS Sight’s tritium “Big Dot” front sight on my S&W “J” frame revolvers with fixed sights. Installation requires cutting down the existing front sight and epoxying the XS sight on top of the remaining stud. I’ve done this using hand files, but like any metalwork, a milling machine is best. (Yet another reason to own a small bench-top milling machine.)
Other pistols require a little creativity and some mix and matching. XS “Big Dot” shotgun sights can be installed on fixed sight “K” frames. The front sight is completely removed, then the barrel drilled and tapped for the required shotgun bead. The sight epoxies on top of the bead. Careful measurements are required to ensure the XS sight is at the proper height. The barrel can be slotted and a custom base machined as a base for the XS sight, which allows easy removal and replacement if needed.
I’m not a big fan of adjustable rear sights on fighting pistols. The sight’s small parts and screws are easily damaged during hard use. For S&Ws with adjustable rear sights, Cylinder & Slide and D&L Sports offer replacement fixed sights. Depending on the pistol, this is a simple remove-and-replace process or may require drilling and tapping the frame. With a little cutting on a milling machine, this replacement fixed rear sight can be installed on a fixed-sight frame. When paired with XS Sight’s tritium “Dots,” these fixed rears provide a better sight picture for both speed and surgical shooting.
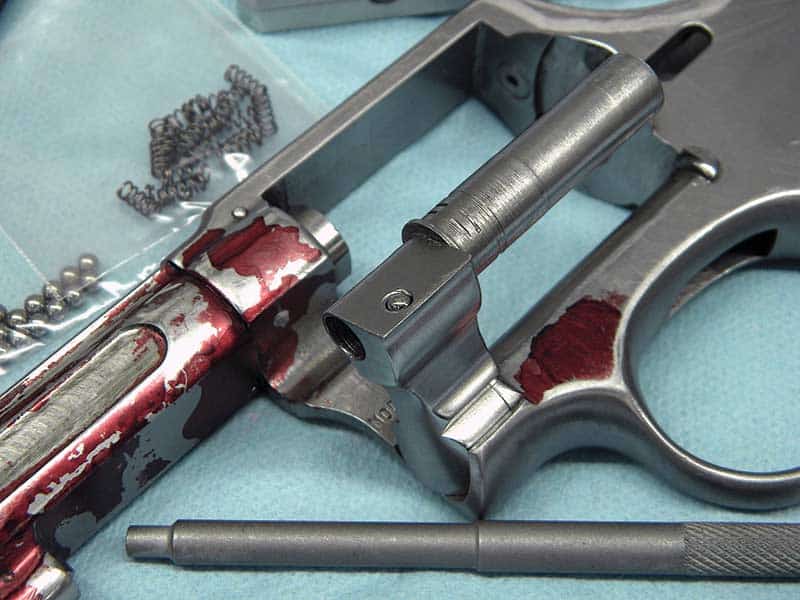
Properly tuning a revolver involves honing and
polishing every part of the pistol.
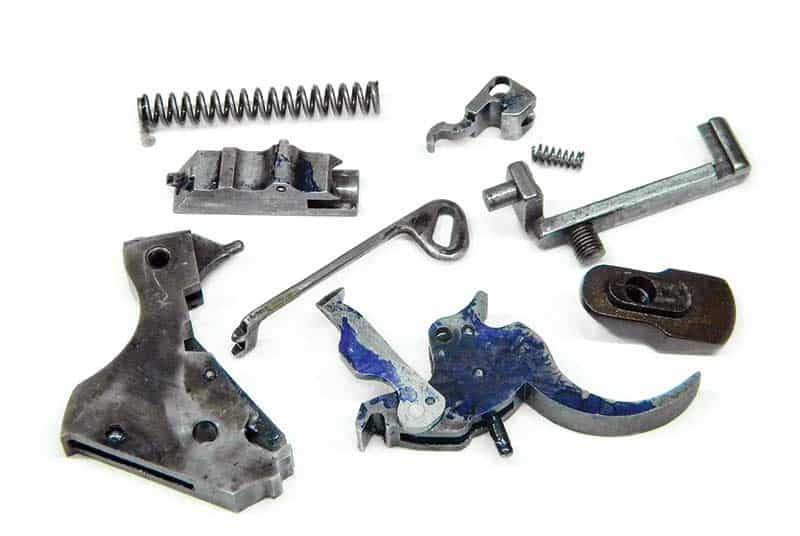
Defensive shooting with a revolver is always done in double-action.
Since the thumb spur isn’t used for cocking, and it often snags on your
concealment garments, bobbing the hammer is a common modification.

Slightly narrowing the trigger guard provides a smooth transition
for the finger when it’s time to place it on the trigger to fire.
Tuning
All revolver shooting for self-defense is double-action. Cocking the hammer for a single-action shot is dangerous. The single-action trigger pull weight is too light, especially with a pistol that has had reduced-weight springs installed. Under stress, you lose dexterity and feeling in the fingers and cocking increases the chances of firing a negligent shot. Also, revolvers are not made to be de-cocked. It can be done but isn’t something that’s safe to attempt, especially under adverse conditions. Do not cock the hammer.
The double-action trigger on most revolvers is heavy, with weights of up to 10 or 12 lbs. This heaviness, which can vary over the stroke, the distance the trigger must travel and sometimes a hitch or gritty feel make it difficult to smoothly stroke the trigger. Tuning the internals reduces the trigger’s weight to a manageable amount and smooths out the action throughout the entire stroke. Trigger reset — forward movement to fire the next shot — should also be slick, without any hitches. Every part inside the gun is polished or honed.
Replacing the revolver’s springs is a balancing act. The goal is to reduce the pull weight, which also decreases the striking power of the hammer against the primer. Springs in a competition pistol can be tuned to a specific ammo/primer combination, but this can be too light for rounds with “harder” primers. Defensive pistols should fire any factory ammo you feed them; your favorite load may not be available. Best to go a little heavier on the springs, then test with a variety of rounds. Installing an adjustable strain screw allows you to fine-tune the weight.
There’s much more to tuning a revolver than just replacing springs. A smooth trigger stroke is achieved by honing and polishing the internals. There’s no great gain in “reworking” just a few of the parts. When every part is addressed, seemingly “small” improvements add up to a large gain. The difference between the trigger in a factory pistol and one with a tuned action is significant.
Obviously, there’s too much involved here to list everything involved in tuning the wheelgun. I recommend starting with Jerry Kuhnhausen’s “Shop Manuals” and some of the great videos on tuning by Jerry Miculek.
Tuning also includes cutting a new crown on the barrel. This improves accuracy, even on a new factory revolver. A caliber-specific brass pilot goes in the barrel to keep everything aligned and the cutters will work with a variety of calibers. The pilot and cutter are attached to a “T” handle and you apply a little arm power.
I normally start by squaring the muzzle. Use plenty of cutting oil, apply light pressure and turn in a clockwise-only direction. Remove the setup constantly to clean metal shavings from the cutter and barrel and re-oil. This ensures a smooth cut and extends the life of the cutter. After squaring the muzzle, the crown is cut in the same manner. If the barrel diameter is large enough, counter-sink the crown to help protect the muzzle. Final cleanup is done with a round-tip brass tool mounted in a hand drill using a lapping compound.
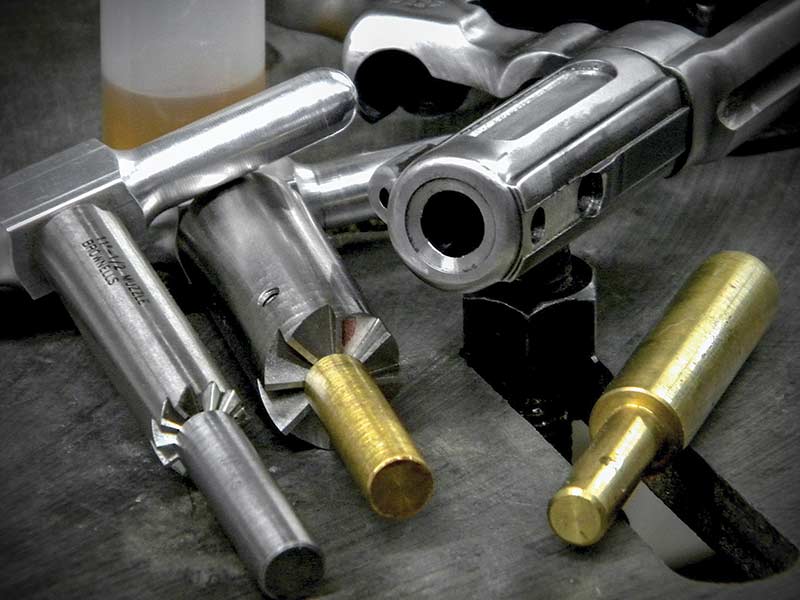
Cutting a new crown on the muzzle will improve accuracy, even with
a new factory pistol. This is an easy modification and the tools to
re-crown are not expensive.

Tools of the trade include hones, various polishing pads and,
for more aggressive metal removal, sanding drums and hard
rubber polishing wheels.
Melting And Dehorning
Most revolvers will benefit from a little “chopping.” Bobbing the hammer is a popular modification. As mentioned above, all defensive shooting is double-action, so the spur isn’t needed. When drawing or presenting the pistol from concealment, the thumb spur will snag on the cover garments. Use a rotary tool with a cut-off wheel to remove the spur, then sanding drums for the final shaping and finish work.
Compared to a semi-auto pistol, the revolver’s double-action trigger travels a long distance. It’s a “stroke,” as opposed to the short “press” of a semi-auto. During the stroke, your finger slides down and pivots across the face of the trigger. A lot of triggers have boxy shapes or vertical serrations on the face. Removing the serrations and putting a nice radius between the face and sides of the trigger produces a smoother stroke.
Manipulating the revolver — loading, reloading, and unloading — is somewhat of a juggling act. You can keep it in the strong hand or transfer it to the support hand. Regardless of the technique used, melting and dehorning, removing any sharp edges or corners on the revolver makes these actions more “user-friendly.” A small radius on the front of the cylinder and barrel makes holstering easier. Narrowing the front of the trigger guard slightly allows a smoother transition of your trigger from finger guard — where it’s safe — onto the trigger when it’s time to fire.
While the pistol is disassembled, it’s a good time to install a third lock in the crane, which some earlier model pistols were equipped with from the factory. A hole is drilled into the top of the crane, and a spring and ball detent staked in place. A corresponding concave spot is cut into the frame, providing a third point for the cylinder to lock into the frame.
Revolvers are easy to shoot, and with the proper training backed up with plenty of practice, they’re ideal for self-defense. They offer numerous advantages over a semi-auto pistol. After discovering a revolver that works “good” for you, a few modifications will make it “perfect” for defensive purposes. Time and a little investment in the proper tools can produce “expert” work in your shop. Like everything, it’s all about practice. Each time you repeat a process, you’ll learn more and become comfortable and confident in your work.
It is with a heavy heart we’re running something a little different in this space. Tiger McKee, long-time author of this Tactics & Training column, has passed away.
While Tiger has graced the pages of American Handgunner with his insightful teachings on personal defense, concealed carry and firearm-related tactics, he’s perhaps best known for his lifelong commitment to being a student. This “always learning” mentality was behind the success and reputation of his ShootRite Firearms Training Academy in Langston, Ala. Tiger racked up accolades from recognition, including expert ratings on pistol and rifle from none other than Col. Jeff Cooper of Gunsite Academy, and teaching certifications from Thunder Ranch and the Federal Bureau of Investigation. But it was always his self-described “lifelong student” approach that made him so relatable.
Tiger has been a prolific writer, publishing hundreds of “how-to” articles on self-defense and shooting techniques. In addition to his magazine and newsletter work, he found time to publish two successful books, The Book of Two Guns, “a unique chronicle of 10 years of training in the tactical use of the 1911 pistol and the AR-15” and AR Skills and Drills: Learn How To Run Your AR Like A Pro.
In recent years, Tiger’s passion expanded to DIY gunsmithing and customization. You may have noticed more and more articles in American Handgunner and some of our special editions highlighting Tiger’s shop work on revolvers, Hi-Power pistols and more. I know of no better way to honor the man than to share his work, so for this issue, we’re running his more recent “DIY” story submission in this space.
Tiger will be missed. He was a true gentleman. —Tom McHale