Time to Clean the Brass
The Ultimate Reloading Series Part 3

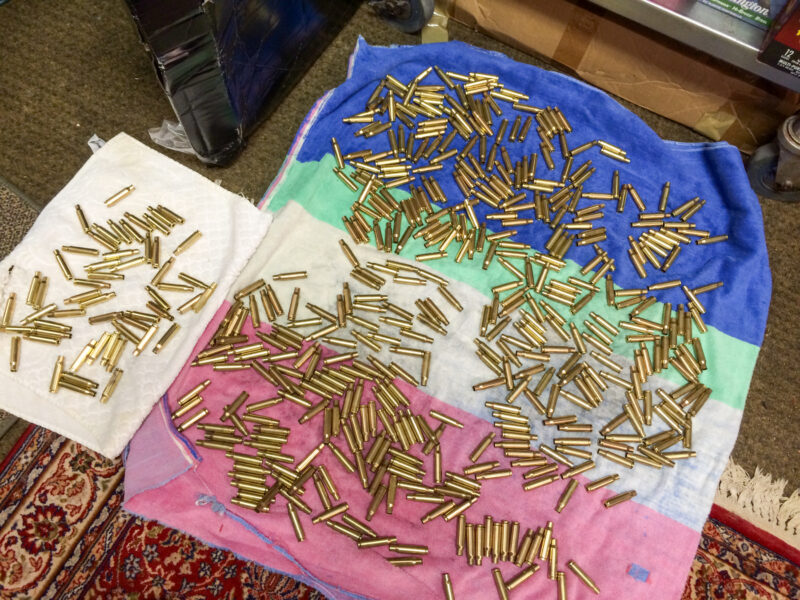
On the left is wet tumbled range brass. With some care, you can get it like-new shiny and clean.
In earlier parts of this series, we have discussed the importance of starting with squeaky-clean brass when you begin your reloading process. It’s important to note that “squeaky clean” doesn’t necessarily refer to shiny, sparkling brass color. What I mean by that is that brass should be completely free of all residue and debris, including range dirt, powder residue, oil, and whatever other gunk might get on your cartridge cases. While looks are important, the most important factor is ensuring the brass goes through the reloading process properly and without damaging your dies or other equipment.
Now, with all that said, there is absolutely a benefit to polishing your brass so that it looks as shiny as Tower of Power’s horn section. That consistent, bright color makes it much easier to spot damage to the cases, such as cracks or small dents. It also makes it easier to read the case head stamps on the bottom in case you need to verify anything or sort brass by manufacturer.
Last but not least, it makes it a little easier to verify that the primer pocket is the size you expect on your brass. For example, some manufacturers have begun producing .45 ACP cartridges with small primers. Historically, .45 ACP has used large primers, so, as you might guess, getting some of those small-primer cases mixed into the process is gonna cause problems for you in the priming step, because trying to jam a large primer into a small pocket just doesn’t work. Remember, primers are built to detonate via pressure, so you can imagine the potential outcome of trying to do such a thing.
Now, with all that said, I would say there are three-and-a-half approaches to cleaning brass. Let’s dive in.
Read Part 4 (Case Resizing).
Budget Method
The “half” approach involved no special gear. I am a big believer in not waiting until you can afford all the optional gear before you start reloading. The cleaning step definitely has some optional gear decision opportunities.
If you want, and if you’re not too concerned with polished, shiny brass but with clean brass, you can start with nothing more than a bucket and a towel. Just fill that bucket with hot water and a little Dawn dishwashing detergent, then agitate like crazy. You can use a stick for stirring, or if you have a bucket with a tight-fitting lid, just shake it until your muscles are too sore to continue. When you’re finished, rinse and strain out the brass. If it’s really filthy, repeat the process. It’s easy to do hundreds and hundreds of brass cases at one time using this method.
Here's a "free" brass drying system. This is on the floor of a dehumidified room, but out in the sun works quicker.
The important part is to make sure it is thoroughly dry. If you don’t want to get in trouble by using your oven at a very low temperature, you can just spread it out on a beach towel in the driveway out in the hot sun for a little while (or maybe a long while) until it is thoroughly dry.
When all is said and done, you have acceptably clean brass for reloading. It may not look pretty, but it will work.
Ultrasonic
Ultrasonic cleaners (the larger versions of the jewelry devices) can do a pretty good job of cleaning brass. They will absolutely make it clean and safe. However, I found that they don’t necessarily do the greatest job of polishing. So if you want it to look factory-new and you only use an ultrasonic process, you might be a bit disappointed. But it’s relatively affordable (just one piece of equipment), and you will get clean brass. The only thing you have to worry about is drying it, so go back to the oven or the towel-in-the-driveway method.

This Lyman ultrasonic cleaner makes quick work of cleaning a couple of hundred cases at a time.
Dry Tumbling
The easiest and least expensive method for cleaning and polishing brass is traditional dry tumbling. The idea is to fill a tumbling tub with some sort of cleaning media like walnut shells, bits of dried-up corn cobs, or some other natural or artificial media, dump the brass in, screw the lid on tight, and turn on the vibrating motor.

Here's a well-used Lyman tumbler. It must be well over 20 years old and is still cleaning brass.
Note the used dryer sheets collecting grime.
The idea is that over a few hours, the agitation and friction of the cleaning media will eventually scrape off all the dirt, grime, and oil. In addition, that same friction action will polish the case back to its original look. Companies make polish additives that enhance the shine of brass. If you want it to look new and squeaky clean, change your media often and use one of the polish additives.
There’s one more pro tip to add longevity and effectiveness to your cleaning media. Take some used dryer sheets, rip them in half or quarters, and throw a few of those in with the tumbling media and brass. They have a tendency to absorb a lot of the dirt and grime, so it doesn’t remain on the media itself, thereby making your cleaning media last even longer.

The ultrasonic method is arguably "neater" but the dry tumbler does a better job of renewing the brass shine.
Wet Tumbling
I’ve saved the Pro method for last. That is wet tumbling. Imagine a 1- or 2-gallon-sized drum, usually made of plastic (for noise purposes). You dump your brass into the drum with a supply of hot water and soap, then add thousands of tiny stainless steel pins. I like to add a bit of Lemi-Shine to the mix for extra shiny brass.
You then seal up the drum and put it on a rotating motor so it spins and spins. The concept is similar to dry tumbling, except for the water and the rotating action instead of vibration. The process forces the pins swirling in the hot, soapy water to scrape and scrub all the dirt and grime off. If you want shiny brass, this is the method for you. The wet tumbling method gives you the cleanest, most refreshed-looking brass possible.
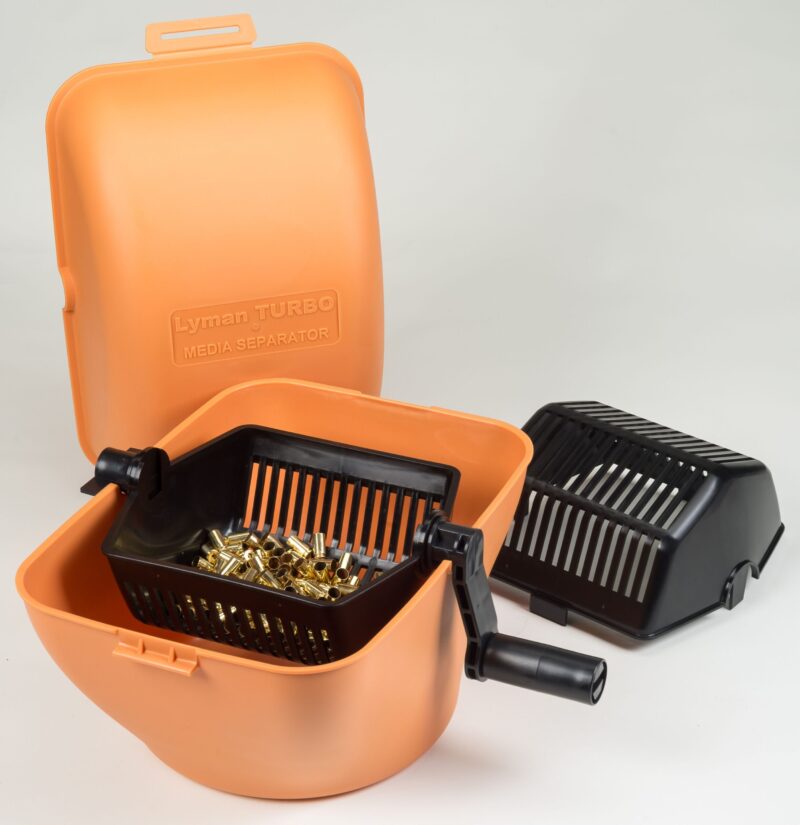
A case/media separator makes quick work of removing dry tumbling media, or even wet steel cleaning pins from cases.
Once it’s washed, you have to worry about two things:
First, you must separate the brass from the pins. There are a few ways to do this. Some companies make giant magnets that you swish around in the brass, and they suck up all the stainless steel pins. Release them back into a different container for infinite reuse.
You can also try using a rotary media separator. These are typically used to separate brass from dry media during the dry tumbling method. Envision a rotating basket that holds the cases while allowing smaller objects (the steel pins) to fall out into a tub enclosure.
Whatever the method, you’ve got to make sure all of the steel pins are out. They do tend to get stuck inside the cartridge cases, so whether you tap them out individually or use a bulk tumbling method, make sure you thoroughly separate the pins and cases.

Here's the reloading version of a food dehydrator. Blowing, warm air does a great job of drying
all the nooks and crannies of your freshly cleaned cases.
The second thing you have to worry about is drying your brass. Again, you can throw it out on a towel in the driveway or use a drying machine. Since you’ve invested in a wet tumbling setup, I would recommend a case dryer. These are kind of like the machines that make beef jerky and dried fruit slices. Throw your brass in there, spread it out on the trays, turn it on for an hour or so, and you have perfectly dry, sparkly-clean brass.
There you have it: several ways to turn that used brass into ready-to-reload cases.
Read Part 4 (Case Resizing).
If you missed Part 2 (The Process).
Get more exclusive online content from American Handgunner delivered straight to your inbox. Sign up for our free American Handgunner Insider newsletter.