Insides On The Outside
DIY: How to See Inside with Cerrosafe

For best results, the area to be cast should be heated prior
to pouring in the Cerrosafe. Jeremy used a heat gun, but
judicious use of a propane torch would work just as well.
There are things in this world that are hard to measure: the exact path, for example, that a toddler will take to cover any particular distance you ask them to traverse. Things with outsides, like the diameter of a barrel, are, generally speaking, easy. Insides are harder. This is especially true if it’s an irregular cavity such as a chamber with a taper or bottleneck, where just measuring the diameter of the hole won’t tell you what you need to know. For these, there is Cerrosafe.
Available from Brownells, Cerrosafe is a metal alloy with a low melting point (under 200 degrees) used to create a cast (a “positive”) that can then be measured to determine the dimension of the space into which it was poured. Granted, any metal with a low-ish melting point, such as lead, could be poured into a chamber. The problem is that it’s not likely to come back out again without being melted out, which sort of defeats the purpose. What makes Cerrosafe special is that after it is cast, the material shrinks as it cools until it is undersized and can be gently driven out, which has to be done within the first half hour of hardening. After that, it expands until (after one hour) it is the exact dimension of the space into which it was cast and can be measured. It stays that dimension for the next week or so (200 hours, they say), after which it expands to 0.0025″ oversize. Hence why it needs to be removed within 30 minutes: Once it expands, it will be very difficult to remove.

The basics: Cerrosafe and something to melt it in. While a
spout would have been nice, this stainless ladle worked just fine
to melt the Cerrosafeand pour it into the chamber Jeremy wanted
to measure.

Jag in place just forward of the chamber area and ready
to receive the Cerrosafe.
Cerrosafe Uses
While Cerrosafe can also be used to remove cartridge cases stuck in place after the heads have separated from the body of the casing, its most common usage is to measure chambers, throat and bore dimensions, etc. For this article, I wanted to determine the shape and dimensions of a Colt .22 barrel for the purpose of reverse engineering its floating chamber system. If what I want to do with that works, it’ll probably appear here in a year or so.
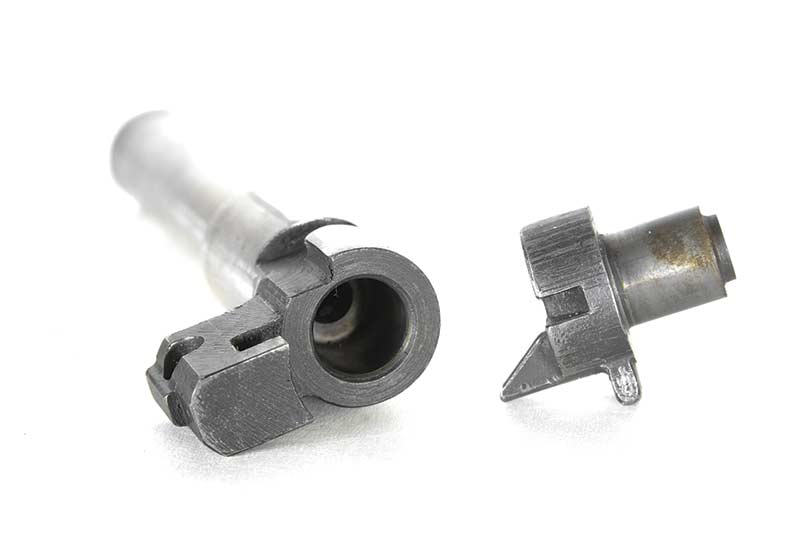
The first project was measuring the recess into which the floating
chamber fits in this Colt .22 conversion barrel. Part of reverse engineering
the system is to apply it to something Jeremy’s not talking about just yet.

The cast fully expanded to cavity size and ready for measuring.
Note it even captured the shallow .22 LR rifling.
Getting Started
The procedure is straightforward and safe if you’re careful. First, clean the barrel and especially the chamber well to make sure it’s both clean and dry. Among other things, the chamber also needs to be smooth, as a rough chamber will create enough friction that the cast will not be able to be removed.
The second task is creating some sort of dam to keep the molten Cerrosafe from flowing down into the barrel. The instructions suggest using a brass cleaning jag with a tight-fitting patch to block off the bore. I tried a couple of different types of patches until I got the tightest one I could force down the .22 barrel by hand. Having inserted the brass cleaning rod from the muzzle — which is the correct direction — the loop end of the rod still stuck out far enough to give me something to mount it in place. After taking my big 60-lb. vise off the bench and putting it on the concrete floor of my garage, I oriented the barrel vertically with the chamber area pointed upwards, ready to receive the molten metal, then clamped it into place in the vise. The process works best if the area you’re casting is also warm, so I used a heat gun to bring the chamber area to the point it was uncomfortable to touch before pouring the Cerrosafe.

Yes, it melts at a low temp, but we’re still talking about working
with metal melted over an open flame. Use appropriate protective
gear and work in a safe area.

Cerrosafe melts below 200 degrees, which can be easily reached
by a propane torch, serious heat gun, or a camp stove. Jeremy chose
the camp stove: Since it has a base, that’s one less thing to juggle
while you’re balancing a ladleful of hot metal.
Melting
With its low melting point, a propane torch or even a good heat gun will melt Cerrosafe. I chose the easy way out with a propane Coleman stove, which is one less thing to juggle and turned my half-pound block into liquid in just a few minutes. Word to the wise: Yes, it melts at a lower temp than other materials, but this is still hot molten metal that can spatter, so protect yourself with gloves and, even more importantly, safety glasses. Even at a balmy 190 degrees, your cornea will not respond well to a droplet of this stuff.
To melt and pour it, almost any metal container will do (the instructions even tell you how to use a tin can and a pair of vise grips), but I purchased a stainless-steel ladle at the big box store for the task. Wanting a spout, I used the rounded tip of a roll pin punch to hammer a short trough into the side of the ladle to help direct the flow of Cerrosafe. Spoiler alert: It was too small and didn’t work.

Jeremy clamped the loop end of the brass cleaning rod into a vise to hold
the barrel upright and ready to receive the molten Cerrosafe.

Prior to pouring in the Cerrosafe, you need some way to block its
flow so it stays in the place you want to cast. The instructions
suggest using a cleaning jag with a tight-fitting patch as a dam.

The half-pound bar almost completely melted in the ladle.
It doesn’t take long, and since overheating can cause some of
the components of Cerrosafe to separate, it should be poured
as soon as it is completely melted.
Pouring The Mold
The instructions warn against overheating Cerrosafe, as it can cause its various component materials to separate. I poured it as soon as it was completely melted and tried to leave a little mound of material in the middle of the chamber, which is also recommended. As I mentioned, the mini-spout on my ladle didn’t work, which resulted in spilling some on the concrete floor, where it quickly hardened. After allowing it to cool for a few minutes, I held the barrel over a soft towel and tapped the end of the cleaning rod with a hammer. This caused the chamber cast to pop out and down onto the towel, which cushioned its fall. Truly simple and exactly as described: The chamber cast let me see how the cavity that receives the floating chamber is shaped and the size it needs to be. It was detailed enough to show the rifling.

After pouring, it starts to harden almost immediately.
The drip down the side comes off easily with a fingernail
and can be dropped back in the ladle for reuse.

Once the Cerrosafe has hardened, tap the end of the cleaning
rod with a hammer to free the cast from the chamber, but do
so over a towel or some other soft surface so the cast won’t
be damaged when it falls out.
Condition Matters
When trying a similar operation with an old and worn Remington Rolling Block, I learned about the challenges of casting in a rough environment. I could not solve the roughness of the chamber, which kept the cast from coming out. The thin aluminum cleaning rod was clearly not strong enough to withstand being beaten with a hammer, so I used a thicker one just under bore diameter, backed up by a solid aluminum rod, to attempt to drive it out. I pounded the end of the rod into any number of interesting shapes and never budged the casting. In what I mistook for a stroke of brilliance, an assessment that fizzled quickly, I clamped the gun up in a pipe clamp, with one end on either side of the breech and the other end bearing directly on the end of the aluminum rod. I tightened it enough to mushroom out the end of the rod but was not able to dislodge the chamber casting and stopped before I damaged the gun.
Fortunately, Cerrosafe melts at a low enough temp that it will be easy to re-melt it with a propane torch and pour it out to be used again on another project, which you can basically do indefinitely. While this attempt didn’t turn out as I had hoped, it did function exactly as advertised: It doesn’t work with rough, pitted surfaces.
For more info: Brownells.com