Make It Fit
Molding a Leather Holster

When Frank got this excellent SAR9 C, it was brand-new to the U.S.
market and there was no model-specific holster support. Triple K
designed their Victor line (#778) holsters for use with a broad range of
accessory-equipped autoloaders, so it seemed the ideal starting
point for customization.
So, you’ve bought the new hottest of handguns and can’t find a holster for it? Such are the tribulations of early adopters. But there is a DIY solution you can do with a Triple K Victor holster, a pan of water, some plastic wrap, a padded bench vise and the butt of a
Sharpie marker.
It seems to me the American handgunner is in the fortunate position of having a superabundance of quality pistols to choose from. Several new models catch my eye each year from manufacturers big and small, domestic and foreign. The market for small, concealed, carry-oriented handguns remains especially hot. With so many different designs, the accessory manufacturers make their best guesses about which ones will be popular enough to warrant dedicated product lines.

Insert the plastic-wrapped pistol into the damp holster
and position it where you want it to be when the holster dries.
General-Purpose Customization?
Kurt Krasne, president of Triple K, a fourth-generation family-run business specializing in top-quality American leather holsters, belts and cases since 1946, told me their product line is mainly customer-driven.
“If we get a lot of requests for a holster molded and cut for a specific new handgun, we’ll do it,” Krasne said. “We created the Victor line because people need quality holster solutions for all these new autoloaders. We looked at the overall autoloader market and designed the most practical, outside-the-waistband, general-purpose holsters we could.
“It was hardly a simple task. We had to consider not only the dimensions of the pistols themselves, but also the dimensions of the sighting and lighting accessories that are increasingly added to them by their owners. There are 20 different brands of pistol lights, targeting lasers, red dot and halo sights out there if there’s one. To better accommodate these accessories, the pocket of Victor holsters is bigger at the muzzle, and they are cut lower around the top of the slide.
“The beautiful thing about leather, aside from its actual beauty, is it naturally forms itself to the handgun and the body as you break it in. It customizes itself in this respect, and many people who have never used a leather holster are surprised at how firmly they can hold. With a properly fitting leather holster, an additional retention strap is superfluous. The large Victor (#778L) is for medium autoloaders up to 1911. The extra-large Victor (#778XL) is for large-frame autoloaders or medium autoloaders with large rail-mounted lights or lasers. Obviously, a general-purpose holster won’t be a perfect fit for all gun/accessory combinations. Still, the Victor line was intended to be a great to good solution for the many and a serviceable solution for the rest.”
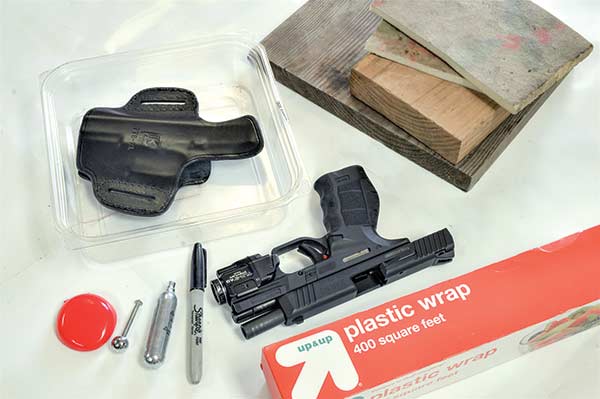
It doesn’t take much to custom mold a leather holster. You need the gun,
a pan of water, a towel, plastic wrap, a bench vise, some wood blocks to
pad the bench vise, some dense foam rubber for the initial shaping
squeeze in the vise and some smooth tools for the hand boning.
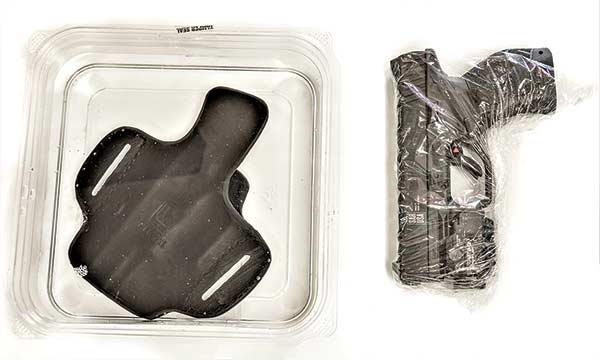
Soften the leather in water for a minute or two to make it pliable (left).
Though the outside surface of this holster is finished and repels water,
the backside is raw and soaks it right in. Cover the gun up well in
plastic wrap to protect it from moisture (right).
Mold Your Own
Krasne told me how they mold holsters at Triple K. It was guidance I could use for the DIY customization of a Victor XL holster for my new SAR-USA SAR9 C pistol equipped with a Streamlight TLR-8A G combination 500-lumen tactical light and green targeting laser. A new pistol rarely impresses me enough to buy it, but the 15-shot compact version of the Turkish military SAR 9mm did. Matched with the Streamlight light/laser combo unit, I think you would have a hard time finding a better quality or better performing self-defense/concealed carry set up this size. I needed a holster for it, and since no model-specific holsters were available, the Victor 778XL was a natural starting point.
Wipe off the excess water and let the leather dry for a few minutes.
Be very careful handling it. When wet, the surface takes marks easily.
Black hides a lot, but dirty fingers can stain light-colored leather.
Leather Fitting
You never want a brand-new leather holster to have a loose fit around the gun. Tight is best because the leather will stretch as it breaks in. A loose holster will only get looser. Fortunately, the Victor/SAR9 C/Streamlight combo had that tight, “I’ll never be able to draw this” initial fit. Left to break in naturally, I expect it would have worked out perfectly in terms of the balance between retention and ease of draw. However, it was not yet the perfect holster for my specific gun/accessory of choice. There were three problems I needed to address to get there, all of which could be solved simply by getting the pistol to seat a little higher in the holster pocket.
When the pistol was fully seated in the holster pocket, the first problem I saw was the SAR9 C’s somewhat overly obtrusive magazine release hanging up on the throat of the holster and releasing the magazine. The second problem was the lens of the tactical light protruded from the bottom of the holster, leaving it unprotected from the bumps, bangs and scuffs of daily carry. The third problem was the rear belt loop interfered with my grip when drawing. Specifically, while drawing, the top of my index finger was hitting leather instead of the bottom of the trigger guard. To get the correct shooting grip on the draw, I needed to get the pistol to sit about 1⁄4″ to 3⁄8″ higher in the pocket. By happy coincidence, it was about the same distance the pistol needed to move up to prevent the lens of the light from sticking out and accidentally depressing the magazine button.

Insert the damp holster and pistol into the padded vise sandwiched
between thick pieces of dense foam rubber. Make sure the surface of
the foam is smooth, or you’ll end up transferring the surface finish of the
rubber to the leather. Squeeze the holstered gun between the rubber sheets
to transfer the general shape of the pistol to the leather. Frank left it in the
vise for 30 seconds. Use common sense when tightening the vise.
The idea is to imprint the leather, not crush the pistol’s slide.

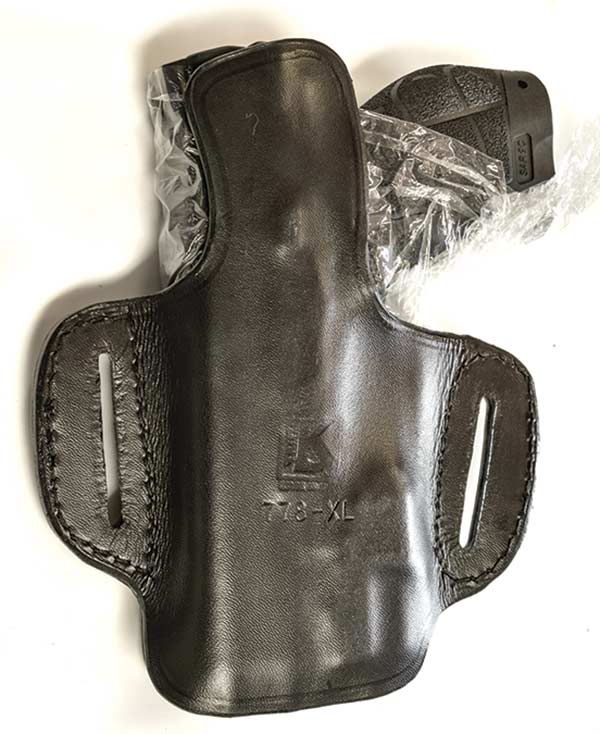
Fresh out of the padded vise, all traces of the GLOCK molding in the
original holster disappeared, and it took the basic form of Frank’s
Streamlight TLR-8A G-equipped SAR9 C.

Using a smooth, round drawer-pull knob from a hardware this-and-that box,
Frank is hand boning the details around the front of the light to create a
small shelf inside the holster to hold the pistol up higher in the pocket.
The goal was to develop internal support to hold the gun in the desired position.
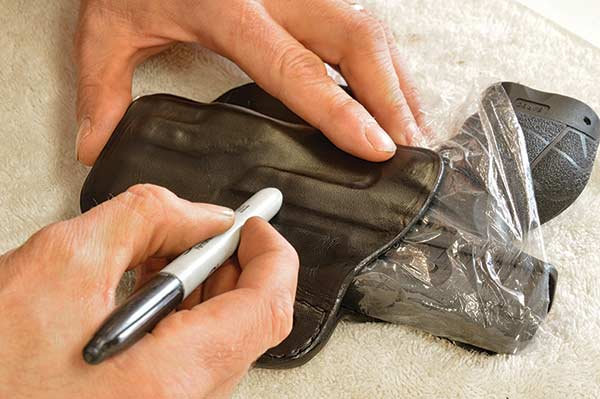
The smooth butt of this marker was handy to create long, sharp creases on the holster’s vertical axis to help stabilize the pistol from unwanted horizontal movement.
Holster Molding & Boning
To hold a handgun in a fixed position when it is holstered, holster makers can mold the holster material, be it leather or synthetic, to match the contours of the specific handgun. When wet, leather is quite pliable and can be stretched and formed into surprising shapes. In the case of holsters, a plastic model of the desired gun is inserted after wetting the leather to allow it to be shaped. The holstered plastic gun is placed between two sheets of resilient material (like ½”-thick dense foam rubber) and squeezed together in a press for 10 seconds. The flexible squeeze forces the leather around the higher contours of the pattern gun, imprinting its basic shape on the inside of the holster. Naturally, it shows on the outside too.
Once the basic shape of the plastic gun is transferred into the leather, detailed shaping is done by hand with smooth tools used to individually press in features not formed in the initial mechanical pressing. This handwork is called boning. The tools must be smooth because wet leather is susceptible to marking and surface tearing. Through boning, a holster maker can tool depressions in the leather to closely engage the gun’s contours and exterior features and make a custom pocket that, once dry, goes a long way toward holding it consistently in the desired position.
Damp leather forms easily, so boning requires no strength. While the leather was wet, it was effortless to bend the double thickness of leather forming the belt loops into a curve that would fit around the gun belt nicely. The amazing thing is how the leather, for the most part, stays in the place you press it.
One could get artsy-fartsy here, but my purpose was to support the gun in a higher position in the pocket, so I created internal shelves inside the holster matching the exterior contours of the pistol and light. I sculpted the leather under and around the front contours of the light and slide and at the back of the trigger guard where it broadens out to the entire width of the frame. I also pressed in the whole ejection port area to serve as a shelf and an anchor. Vertically oriented details were boned in to stabilize the gun from forward and back motion.

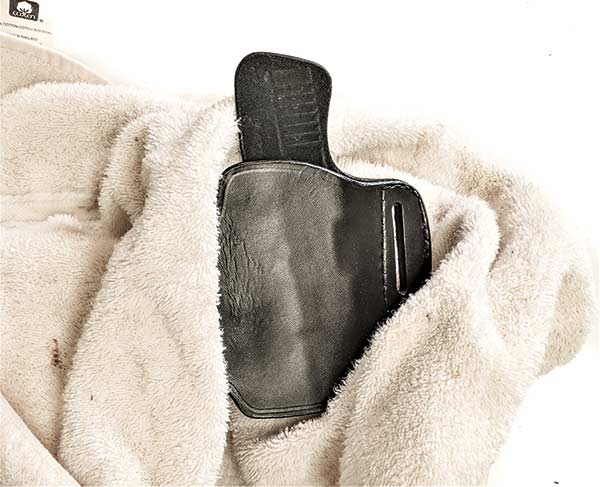
The finished boning shows how Frank created a shelf at the bottom of the holster, behind the trigger guard, and in the ejection port to vertically support the pistol. Once you have the boning done, take the pistol out of the holster and let it dry for a few days. Make sure to unwrap and dry the pistol, too.

The custom re-molded holster has the SAR9C riding high! Note the reshaped belt loops done while the holster was wet so it would fit the belt better.
Drying and Break-In
Once all the boning was done, I pulled my pistol out and set the holster aside to dry. I always advise taking the gun out for two reasons. You want the leather to shrink a bit for a tight fit, and your gun might rust if you leave it in. When I took the plastic wrap off my gun, which was wrapped for only 30 minutes, I noticed some moisture had found its way inside.
When the holster was completely dry, I started wearing it to break it in. The molding held the pistol higher as I’d hoped it would, and it became easier to draw as the days passed. At this stage, I am satisfied with the result, but I am considering another modification, one I almost wish I had thought of first. I might have achieved the same end by sewing a plug in the bottom of the holster to hold the gun higher. It wouldn’t have needed to be a full plug. I could have just spanned the inside and body-side pieces of the holster at the bottom with an inch-wide piece of leather to support the muzzle face of the slide. I doubt it would have taken 20 saddle stitches in total to do it. I might do it if the pistol starts to slip down. Until then, my SAR9 C is riding high.
For more info: TripleK.com