Stories From the Bench
Damage caused by using the wrong type of punch to
re-seat a rear sight pin on a Colt Gold Cup.
Stick a Pin in Me, I’m Done
All guns have some sort of pin. Roll pins, taper pins, polished pins etc. And at one time or another, the pins need to come out. It’s how they come out and how they go back in that sometimes can be an issue. If the pin falls out, it could be worn and require replacement. If it won’t come out, it could be rusted. Most pins will require a punch to be removed or replaced. Knowing what type of pin and which punch to use is important. Flat, convex or concave pins all require a different type of punch.
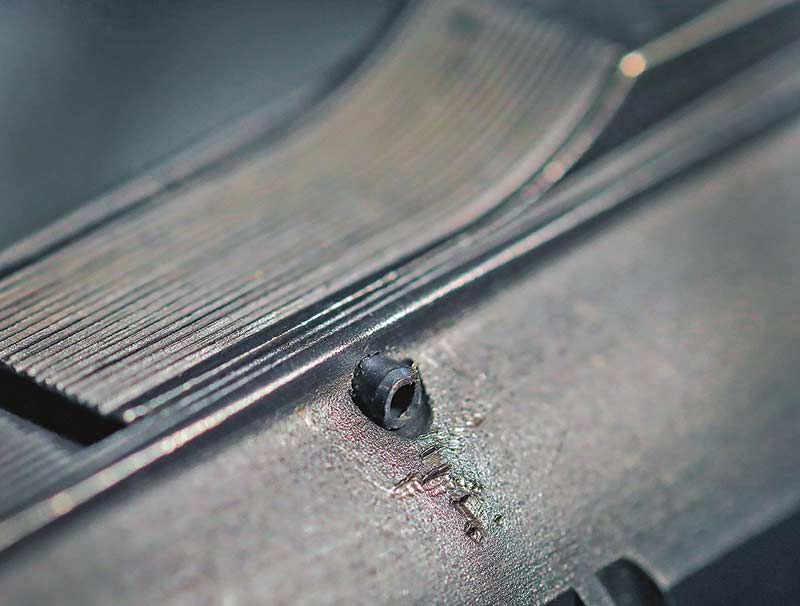
Recently I had a Colt Gold Cup come in for service. Looking it over, I could see that the rear sight cross pin had been replaced with a roll pin. A common problem with the Gold Cup is this pin working its way out while firing. Someone had replaced the stock pin with a roll pin but, in the process, used a drift punch to seat the roll pin. This left some deep gouges in the slide near the pin hole. This is a good example of a punch gone wrong. The roll pin is 1/16th in diameter and very small to hold. In this case, a roll pin holding punch would have started the pin into the hole and sight; next, a roll pin punch would have seated the pin without slipping (this punch has a small tip that fits in the center of the roll pin). This would have saved damage to the slide.
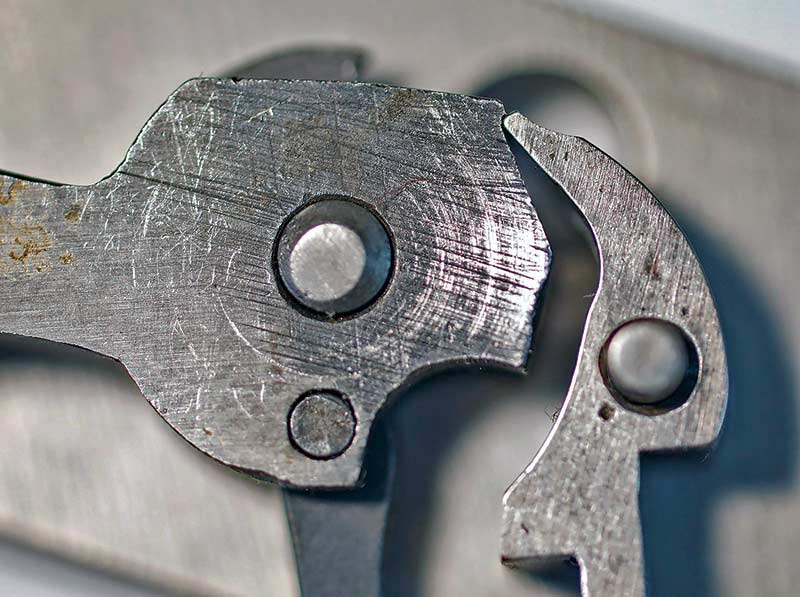
An overcut sear and hammer on a 1911 pistol created the
dangerous situation of “hammer follow.”
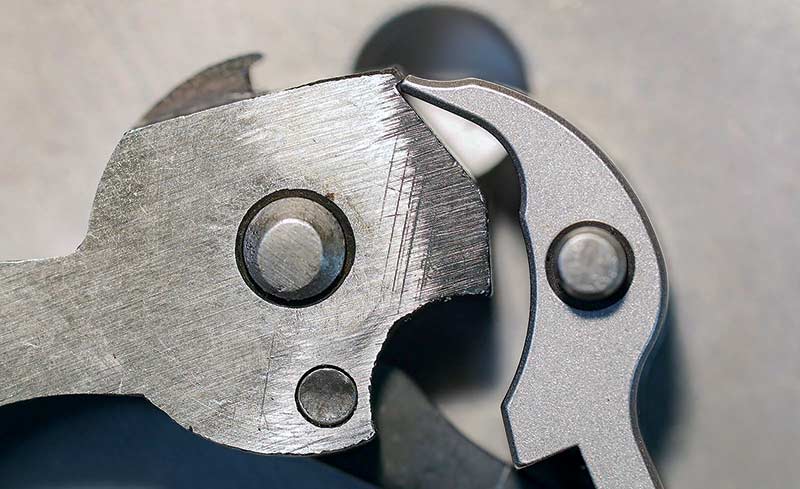
Top: An overcut sear and hammer on a 1911 pistol created the
dangerous situation of “hammer follow.” Below: A new hammer
and sear with proper engagement for safe function.
Too Much Off The Top
There are shade tree mechanics and kitchen table gunsmiths. Don’t be either without knowing what to trim and how much. I know, I know; I hear it all the time. “I thought I could fix it.” Well, some things can be too dangerous to mess with. Sear and hammer engagement on firearms is one area better left to skilled gunsmiths. This problem 1911 recently came into the shop because the hammer was “following.” Following is when the hammer does not hold back during the firing cycle and, in some cases, allows for an accidental discharge of the next round.
There are a few reasons this could happen; sear and hammer hook dimensions are a large reason. In this case the 1911 hammer hooks were filed down to try and make a better feeling break. The issue was that too much filing can reduce the minimum engagement to the point that it does not hold. Each smith will have his own idea of what the minimum should be, but it’s important that “safety is job one.”
I have two measurements I use for the 1911 hammer hooks. One number is for match pistols, which are never carried for self-defense; the other is for everything else. A safe trigger can be accomplished with both. The gun on the bench had hammer hooks cut to 0.014″ and very square at that. That is a dangerous combination. The best fix was to replace both parts with new ones that met safe tolerances.
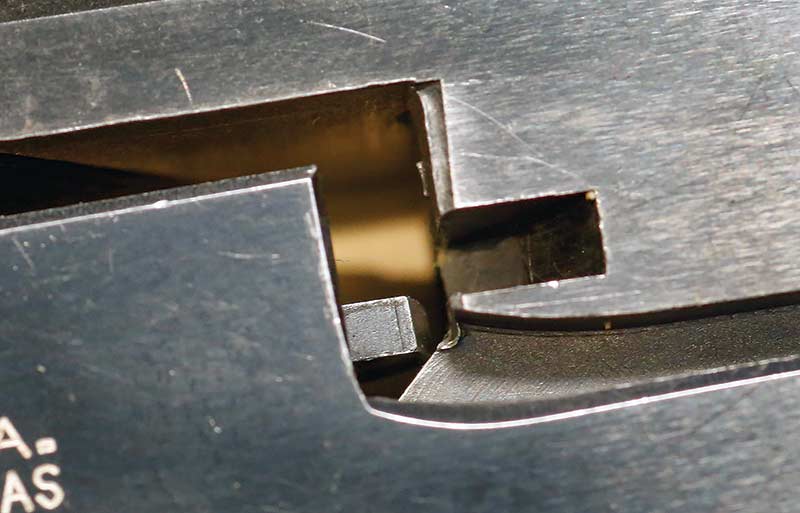
The ejector at center making contact in the wrong spot during
assembly. If done with force, this creates divots on the barrel breech-face.
Keeping The Old Stuff Running
Everyone has a favorite pistol. Maybe handed down from dad or one that you consider “Old Reliable.” Well, keeping them running can be difficult. Take this 1960s vintage Smith & Wesson Model 41. The owner has had it for years, and it started having feeding and extraction issues, which got progressively worse. The Model 41 has been a mainstay in bullseye shooting for decades; they made thousands of them.
Like most older guns, things get worn or damaged from use. This pistol had thousands of rounds through it. At some point, the extractor started impacting the breech face just below the extractor groove. I think this was happening during the assembly process after cleaning. The impact of the extractor left a few deep divots in the barrel, also one near the extractor keyway.
To solve the issue, I filed the breech-face flat and made sure there were no burrs to the barrel chamber. Next, I reshaped the extractor from a square flat surface to a more rounded shape. The front of the extractor should slide easily over the cartridge rim and into the barrel slot. This does not change the extraction of the rounds but removes the sharp edges that were impacting the barrel.
For more info: Brownells.com, Starrett.com, EGWguns.com