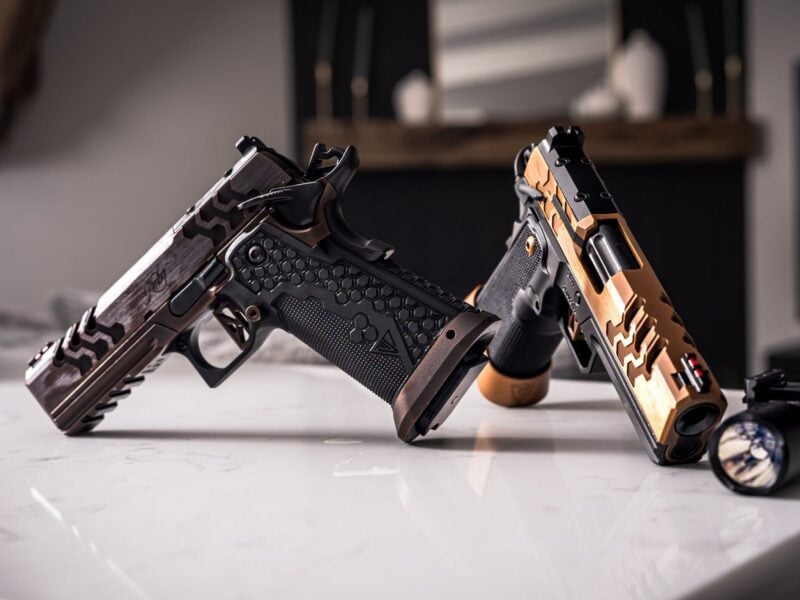
The Fusion of Aesthetics
and Ability
Ed Brown M&P Fueled 9mm
Just about 55 years ago, Ed Brown started his American dream in the way so many successful entrepreneurs do. He began moonlighting in his garage after work and on weekends, doing (and learning) custom gunsmith work. After 20 years of honing his skills, he finally quit his day job and went “all in” to the business of making custom parts like magwells, hammers and beavertails.
Fast forward through lots of custom 1911 builds, a Pistolsmith of the Year award from the Guild and continued expansion, and the Ed Brown crew has expanded from 1911 builds and customizations to the Fueled series. When you think about it, it’s not surprising the company started that project with the S&W M&P with its rough similarities to the 1911 platform — think grip and pointing attributes.
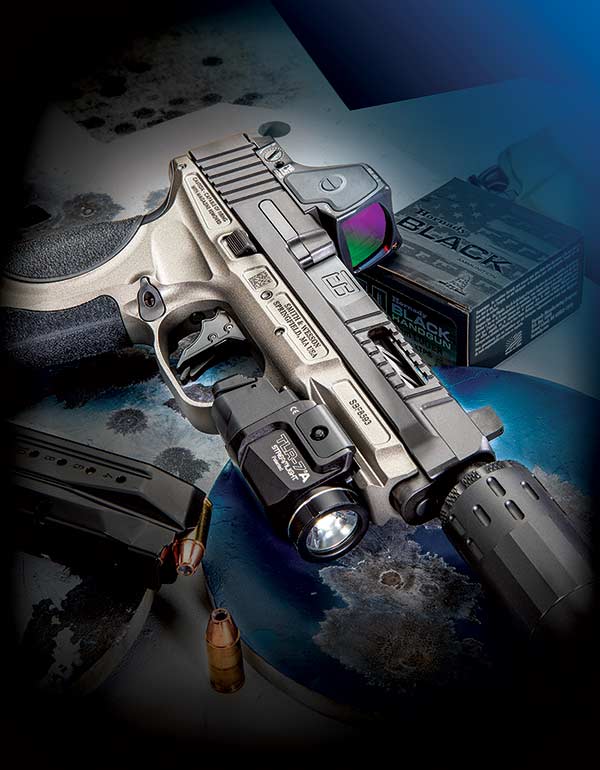
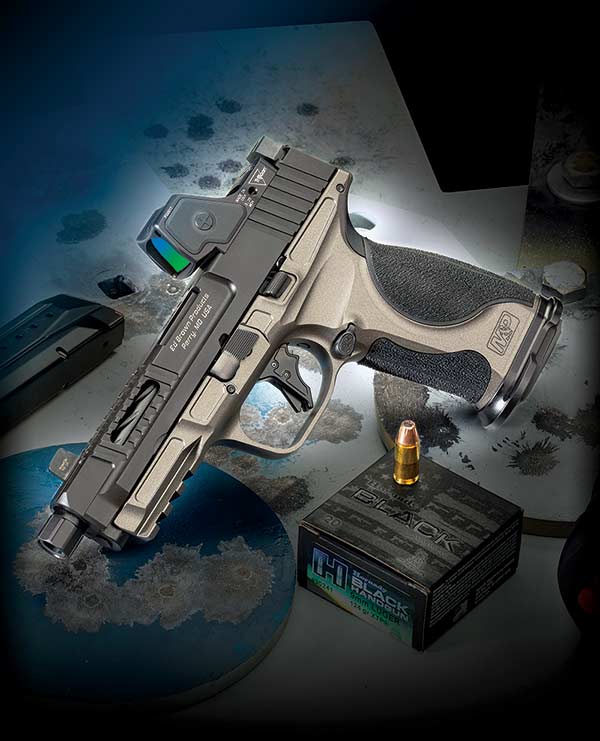
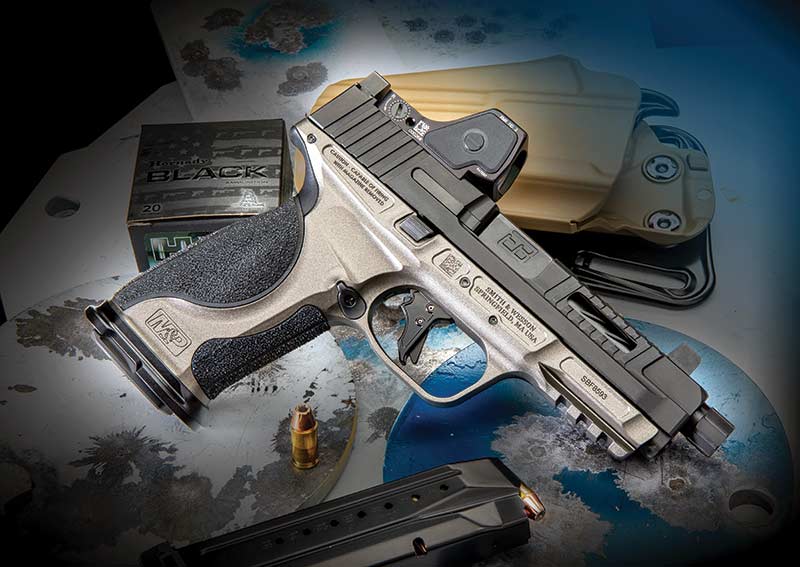
What’s a Fueled M&P? Think completely standard, except nearly every component in the pistol has been replaced with high-end custom versions including the rail block, slide, barrel, trigger system and most other critical parts. So, on second thought, it’s not very standard at all! But seriously, if you were going to build a custom gun from scratch, following the basic M&P design principles, you’d end up with an Ed Brown Fueled.
Are there words to describe this “service pistol” masterpiece? I don’t think so — let Rob’s gorgeous photos tell that story. As for the performance and operations, here’s a summary of my experience with the Fueled M&P.
Ergonomics
I would describe the grip texture as “skateboard tape” as it’s a shallow but aggressive texture. I didn’t have any slippage on my shooting outings, but then again, I wasn’t really sweating with the early 70 and 80 temperatures here during testing. The placement of said texture is nifty looking. The curvy shape on the frontstrap section caught my firing side pinky quite nicely, while the rear portion accommodated all of the palm of my firing hand and gave good contact to the base of my support hand on the opposite side.
Just below all of this, you’ll see an external magwell funnel. It’s black, offering a nice-looking contrast to the rest of the frame, barring the black grip texture areas. The magwell funnel has finger-width cutouts on both sides, which do allow you to grasp the magazine base in case you ever need to forcibly pull it out. The magazine basepad extends only 1/8″ below the bottom of the magazine well funnel, so those cutouts do make a difference should you need to grab the magazine.
The slide has standard square-groove serrations on the rear. The serrations on the front are another feature combining cool appeal and function. The side cutouts go right through the center of the serrated area on both sides … and the top. The serration continues right across the top of the slide too, aiding press checks with a bit more “grip.”
There are generous cutouts/indentations directly behind the trigger reaching almost to the rear of the grip. On the trigger finger side, it was largely irrelevant to me as there was plenty of airspace between my trigger finger and the frame with the factory default length of pull configuration. I shoot with thumbs straight up, so on the support side, this turned out to make a nice index for the edge of my palm just below my thumb.
Trigger
The trigger face is flat with a small hook at the base to keep your finger pad or joint in place on the face. It’s also wide — about 3/8″. It breaks at precisely 3.5 lbs. After depressing the usual safety leaf in the center of the trigger face, it moves resistance-free just about 3/16″ until you hit the pressure wall. From there, you’ll travel maybe a hair less than an additional 1/8″ until you hit a crisp break. If there’s any overtravel, I can’t see or feel it. If you’re one to care about reset, it travels just about 3/16″ forward before you hear and feel the reset click.
In short, the trigger that comes on this pistol out of the box is like one you’d add as a significant aftermarket upgrade. It’s glorious. On one of my shooting days, I was testing both this pistol and a standard service configuration of another make and … wow, this trigger system will spoil you rotten. The side-by-side comparison was revealing to say the least. There is no reason whatsoever to do anything to the included trigger.

Controls
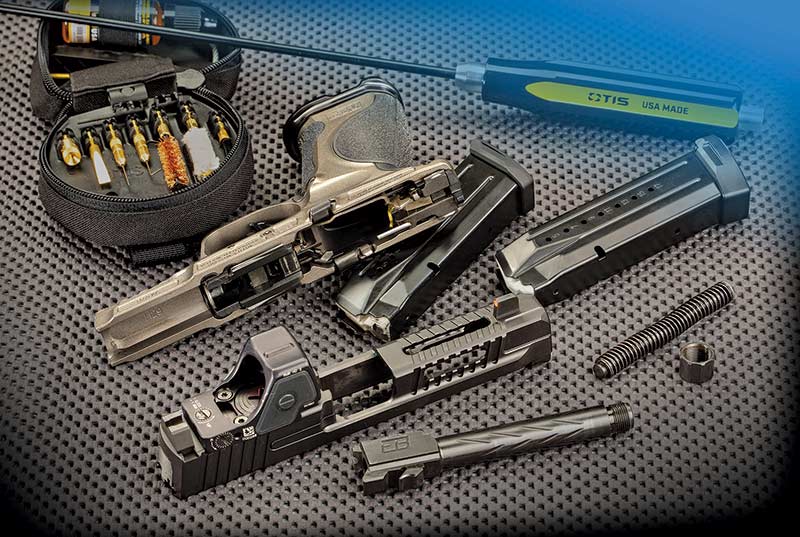
The magazine release button has the same skateboard texture as the front and backstraps of the grip, so dropping the magazine is easy even with off-kilter thumb placement on the button. The steel-body magazines drop freely with ease whether loaded or unloaded. This is one of the benefits of steel vs. polymer magazines. Crammed full polymer mags can get a bit sticky in certain scenarios.
Slide lock controls are present on both sides.
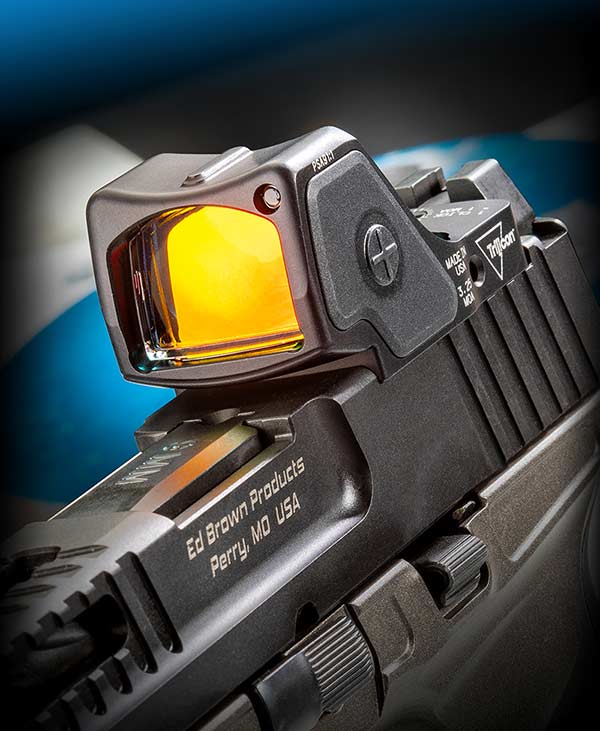
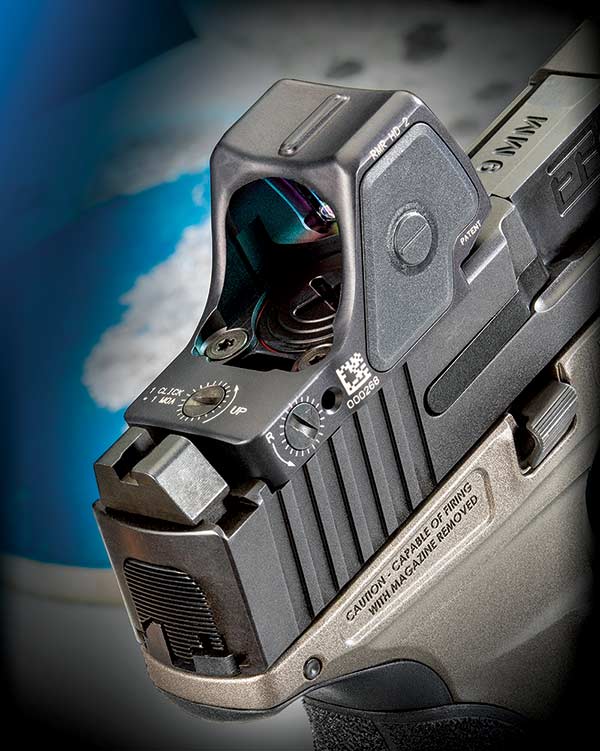
Sights
The sights are tall, and work beautifully out of the box with the Trijicon RMR HD tested. Co-witness was in the bottom area of the glass, so sights didn’t get in the way of optics shooting yet were easy to find.
The rear sight is a flat black notch with no texture on the rear. The front ledge of the rear sight is perpendicular to the slide, so if you’re not using an optic, it’s a simple and sure one-handed racking aid.
The front sight is an Ameriglo model with a tritium center surrounded by an orange luminescent ring.
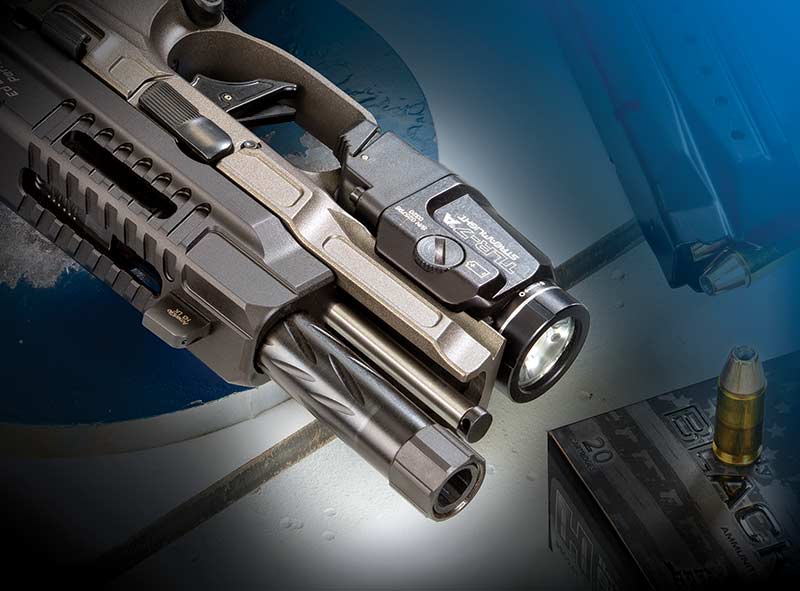
Barrel And Slide
This model came with a threaded barrel with a standard 1/2×28 thread pattern. I stuck my SilencerCo Osprey 45 with a 9mm piston on there and was good to go. Even the included thread protector contributes to the overall “cool” custom appearance. It’s octagonal in shape, but even each flat is recessed with a small ridge. It looks great but also serves a legit purpose — making it much easier to hand tighten and remove the cap. I don’t know about you, but I’m always finding myself re-tightening these while shooting. It’ll be nice to have one I can torque properly without breaking out tools and botching up the finish.
The three slide cutouts show off the cool-looking spiral fluting cut into the barrel itself.
New From Trijicon
A few months ago, I had the opportunity to spend a few days shooting with the new Trijicon RMR HD. Before we get into the differences from the original RMR, let’s talk carnage.
The units in use were pre-production prototypes. They looked like the final product, but most already had 30 to 40,000 recoil cycles from pre-production testing on them, so they were well used. Engineers and marketing folks from Trijicon on hand made one thing clear: Don’t baby these optics. In fact, we were given full permission (encouragement!) to try and smash them to bits.
Before the optics abuse began, we zeroed our respective samples to a 1″ target square at 15 yards and verified repeatability. Check. This is important because, as we were to find out, the purpose of the abuse was not to see if we could break the new RMR HDs but rather to see if they held zero. No one wearing a Trijicon shirt seemed the least bit concerned about any of us actually breaking one of the optics. And they were right.
First, I used a 2″ thick hardwood bench as a slide racking device, using the front face of the RMR HD as the racking surface “lever.” I’m not talking about “pressing” through the wood; I’m talking about holding the pistol 6″ above the bench and smashing it down on the edge with all my strength. After 10 repetitions, the hardwood was “tore up” as we say here in the south, but the optic kept right on ticking. I loaded up the pistol and went back to the 15-yard firing line. My 1″ zero remained dead on.
Next up, after unloading, I flipped my pistol around, holding it by the muzzle, and proceeded to use the optic as a hammer, again for 10 or 12 repetitions of violent hulk smashing. Wood tore up? Check. Optic working? Check. Perfect zero maintained? Check.
Consider me impressed. I literally beat the living snot out of this thing, and it just worked. Clearly, you’re not going to deliberately do these things in real life. But you will, over time, bash it into walls, tables, doors, cars and whatever else you bump into in your daily travels. Those of you using the HD in a duty scenario will certainly subject it to more hard knocks. The point isn’t that the RMR HD makes an adequate hammer. The point is it will keep working regardless of what adverse conditions you encounter.
So, besides reputational durability, what else is in the HD? It’s now got a top-loading CR2032 battery. So every year or three, when you need to change it, no re-zeroing is required. A forward-facing light sensor can auto-adjust reticle intensity based on the target’s light reading. Or you can manually set it where you like, even setting auto-adjustment limits. The buttons are improved, as are the windage and elevation adjustments. Before, they were a bit mushy but offer positive clicks now.
The mount footprint is identical to that of the original RMR, so if you’re upgrading, no worries: Two screws and you’re done. The deck height is also the same, so whatever co-witness setup you have remains constant.
A couple of other nice enhancements round out the package. You’ll see an indexing ridge on top of the lens housing to aid sighting. And some big news, you now have a choice between a single dot and dot with a 55 MOA segmented circle. Dot options include one or 3.25 MOA, and you can even adjust contrast between the dot and circle. If you intend to do any beach assaults or stand out in the rain, the unit is waterproof to 66 feet.
A Capable Looker
For more formal testing, I ran five different ammo varieties through the Fueled: Black Hills HoneyBadger 100-grain, Black Hills JHP 115-grain, Norma Hexagon 124-grain, Norma MHP 108-grain and Norma Safeguard 108-grain.
I started with some general plinking to get the feel of the pistol. Between the 9mm chambering, the phenomenal grip texture and the suppressor, the gun shoots quite comfortably. It didn’t move in my hand shot-to-shot, even with moderate grip pressure. It’s easy to control this pistol, so I shot well with it.
To see what all those upgraded components really do in the accuracy department, I set up targets at 25 yards and proceeded to shoot five-shot groups, measuring velocities along the way.
The Norma Safeguard (1,224 fps) seemed happiest with this pistol, turning in a 0.78″, five-shot group. Yeah, this pistol will shoot if you do your part, and I didn’t do anything special other than use a Ransom Multi-Caliber pistol rest and some careful trigger work. The Black Hills JHP (1,245 fps) also went sub-1″ with 0.94″ for five shots. The Black Hills HoneyBadger load moved somewhat faster with its 100-grain weight at 1,289 fps and printed a 1.56″ group. Norma Hexagon (1,117 fps) and Norma Safeguard (1,131 fps) printed 2.22″ and 2.36″ groups, respectively.
This sample was the F1 Metal version of the M&P Fueled, but several other polymer-frame versions are available. As for pricing, that depends on the specific configuration, but count on starting around $2,195.