Hammer Spur Happiness
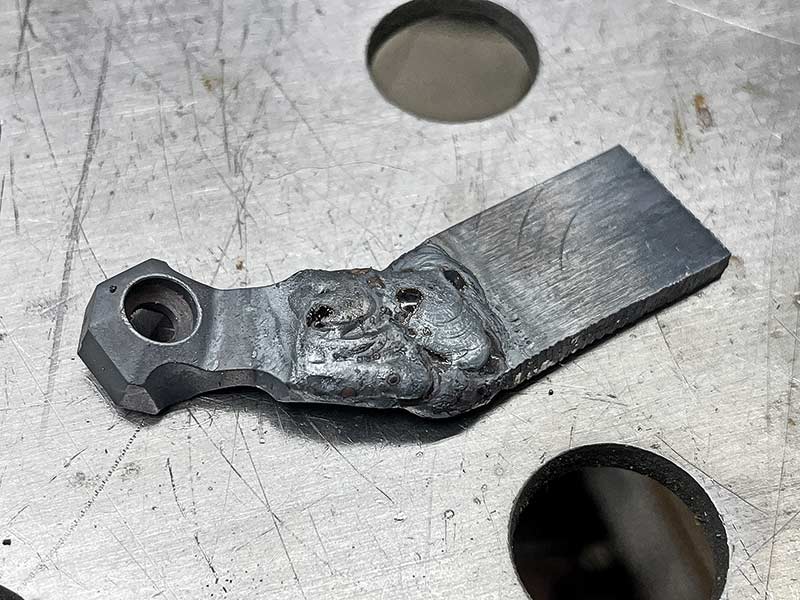
The final install showed the mod was a success and now there was
plenty of access to the hammer spur for cocking.

The extended spur curves down, allowing the thumb to rest on it securely during the cocking movement.
After finally finding a newer TC Encore in .308, I snapped it up, looking forward to testing it in my backyard range. I scoped it with a Crimson Trace rifle scope, promptly discovering even with the supplied nifty TC Hammer Spur adjusted sideways, it was all but impossible to cock the hammer. Really?
It seemed to me it would have been an obvious issue at the factory level, but I think with S&W taking over the line some years ago and their general lack of interest in it, such things could happen. They have since closed down the TC brand, much to the dismay of fans everywhere. But I liked the idea of this stout receiver and .308 barrel, and the ability to swap barrels and calibers sweetens the deal. But I had to do something about that hammer spur situation.
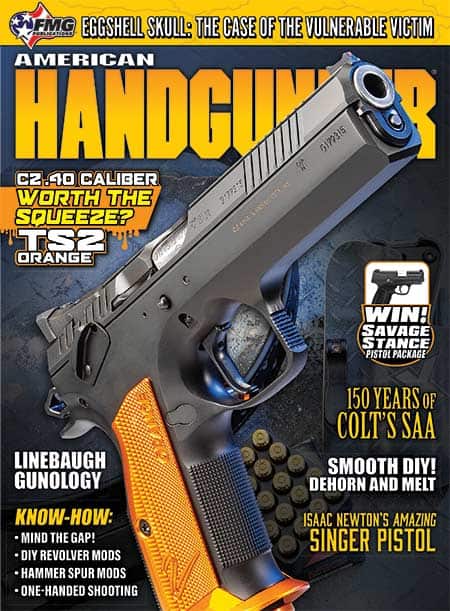
The stock spur is secured to the top of the hammer with an Allen head screw. Where things went awry is the spur itself is simply too short, especially if you use a rifle-style scope with a lens bigger than an average pistol scope. Since these guns can shoot sub-1″ groups at 100 yards, I didn’t want to limit myself with a 2x pistol scope and a narrow field of view.
To extend the hammer spur on his TC Encore, Roy scrounged up a
piece of steel and welded it to the existing spur. The stock one
was just too short when a scope was on the gun.

Some initial rough filing helped Roy to sort of eyeball things to see
if it was working out or not. Note the original screw hole from the stock spur.
Various grits of wet-or-dry abrasive papers, some cold blue
and skateboard tape rounded things out.

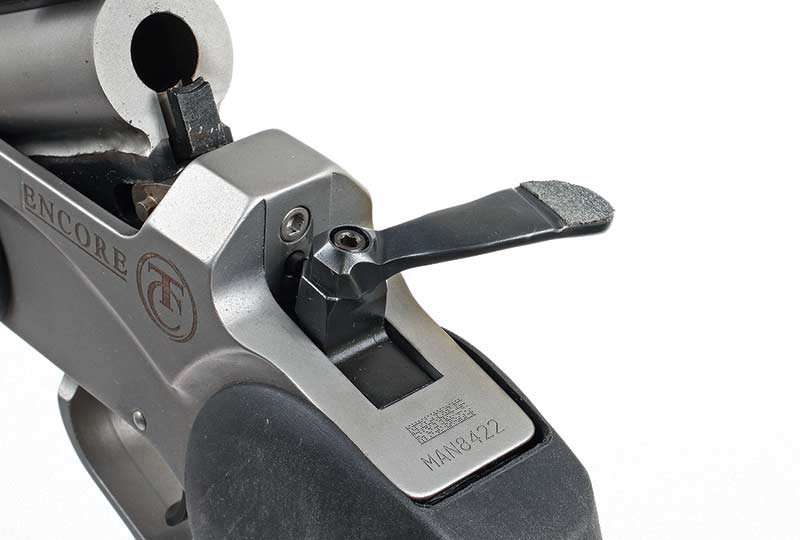
Roy cut through the spur but left enough meat to bend it down. He then filled the void with TIG weld.

Shaping with files and polishing and checkering
yielded an eye (and thumb) pleasing profile.
Work The Problem
I always start a new project by simply deciding what I want to be able to do with the gun when I am finished. Extending the existing hammer spur would work — but how? I thought about making a new spur using my milling machine, but then it dawned on me I could just shape a spur extension out of mild steel and TIG weld it to the existing spur. That takes advantage of the stock attachment bolt, making things much easier.
I band-sawed a piece of scrap steel into a rough shape, then TIG welded it to the existing hammer spur. If you don’t weld, this is a $20 job at any shop so don’t let that scare you away. It’s also always just a bit intimidating to look at the rough part after being welded. It’s easy to think, oh Lord, I’ll never get that looking right. But there are few things I enjoy more than file work, so that’s just what I did — and you can too.
After a half-hour or so, it started to look like I was going to win this war after all. I re-shaped the welded piece, blending it to the original spur, shaping the curve to clear my scope lens. When I had it roughed out, I installed it and found I had guessed right, and things were going to work out just fine. More hand-shaping, smoothing with various wet-or-dry grits and a final bead blast and I had a much better hammer spur in hand.

Another project led to re-shaping the spur on this black powder-framed
revolver. Note how it extends almost vertically — very uncomfortable to use.

The final result makes it much easier to reach the spur with
the thumb, changing the handling of the revolver dramatically.
Final Touches
I was originally going to hand-checker the end of the spur for a better purchase with my thumb but spotted my skateboard tape stash. Skateboard tape is an awfully handy tool around the shop and once applied to a pistol front strap, back strap, grip area or wherever, the term “non-slip” gets a new meaning. It works great, and the self-adhesive on the back of the tape really stays put. So, a bit of tape and some trimming and I was almost there.
I used some touch-up cold blue to make things match the blued hammer and installed my final product. You can see from the photos it reaches past the circumference of the scope allowing me to get a good purchase on that spur for cocking. It changed the whole character of the gun and suddenly made shooting it fun rather than a frustrating ordeal filled with much fussing and grumbling.
In the same way, I altered the shape of a black-powder frame .38 cartridge revolver I have. A typical Italian import, the hammer spur was way too high to reach easily. I cut through the spur almost all the way, bent it down slightly, then filled the gap with TIG weld. More filing, shaping and polishing offered a much more comfortable reach to the spur and changed the entire feel of the gun when shooting. Don’t be afraid to tackle simple jobs like this. Just think beforehand about what you want to accomplish, then move ahead slowly.
I’ve re-shaped hammer spurs on other single-action revolvers, DA revolvers and even H&R Handi-Rifles, and it almost always makes the gun easier to handle and more pleasing to shoot. Keep this in mind if you’re confronted with a recalcitrant hammer spur “situation.”