Case Resizing
The Ultimate Reloading Series Part 4
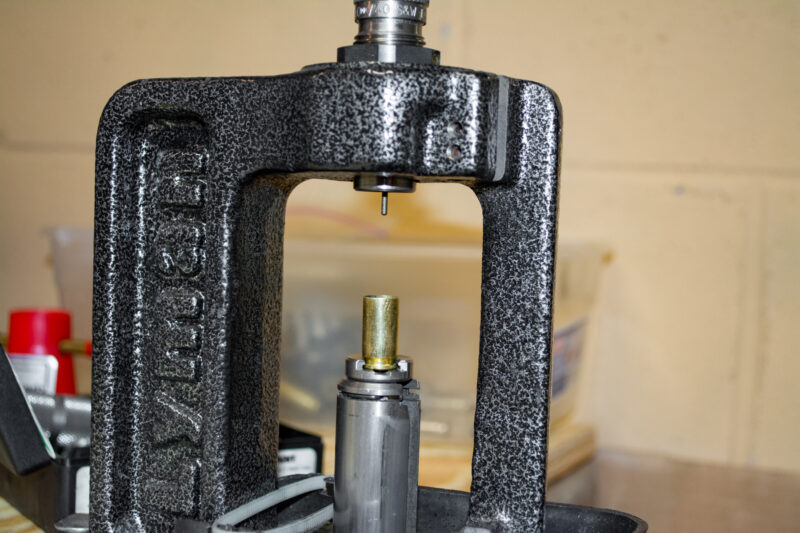
The resizing step. The press piston drives the case into the fixed resizing die.
We’ve done the preparatory steps: hoarding brass, pondering immediate equipment needs and cleaning the cartridge cases. Now it’s time to start the actual reloading process.
When fired, the pressure generated by the rapid burning of the powder and its expanding gas “cloud” causes the brass cartridge case to expand. With most rifle cartridges, this brass expansion is dramatic enough to require both case resizing to reset the diameter and shoulder dimensions and trimming to bring the case back to the correct length. While handgun cartridges also expand, the pressures are generally much lower, so in most cases, we only need to worry about resetting the cartridge case to its original diameter and shape.
While most handgun cases are simple cylinders, or close to it, some use a bottleneck design. Think .357 SIG and some surplus calibers. Even with more cylindrical cases like 9mm and .40 S&W, we can get some weirdness, like the infamous “Glock bulge” from unsupported areas of the chamber in certain calibers and barrel configurations. Fixing that is a topic on its own, so for now, just know pistol cases will, in all likelihood, be lightly deformed in some way just enough to be inadequate for immediate reloading. To ensure they accept a fresh bullet properly and fit into the chamber without drama, we will need to resize them back to factory dimensions.
It’s a pretty simple concept when you think about it. Not all that different from making a hollowed-out watermelon filled with melon balls. Using a small ice cream scoop, the chef forcibly “resizes” hunks of various melons into uniformly sized balls. In the resizing step, we’re forcibly jamming a spent cartridge case into a mold that precisely mimics the desired exterior shape and dimensions of a factory-new brass cartridge case. Pressure and a perfect mold are the name of the game.
What’s a Die?
Dies? Sounds like games of chance. While it’s the correct term for the most used (and required) reloading tools, it might be easier to think of resizing “dies” as “molds” since they produce a desired shape with repeatable precision.
We’ll get into the other types of dies later in the series, but for now, know there are technically four types. In many reloading setups, the functions performed by the third and fourth are combined into a single die.
• Resizing die: The resizing die is somewhat like the chef’s mini ice cream scoop for those melon balls. When you use a press to jam the fired cartridge case into it, the hard steel mold forces the case back into its original shape and size. Resizing dies also feature a steel pin that, while resizing the case, drives out the old primer by punching out through the bottom. Hold that thought.
• Expanding Die: Wait a second, didn’t the previous die just compress the cartridge case? Why is this one an “expanding” die? The name is a bit misleading, as it only “expands” a small part of the case, the mouth, so we can seat a new bullet later in the process.
• Seating Die: This one pushes a fresh bullet into the prepared case and seats it at the correct depth. A seating die will have some sort of adjustment, usually a threaded piston, that allows you to set the precise seating depth to account for different bullet types and load specifications. It’s kind of like a hole depth adjustment on a drill press, only more fun.
• Crimping Die: There are a couple of types, and we’ll get into the specifics later in the series. For now, know that a crimping die for most semi-automatic calibers removes the flared case mouth created by the expanding die. For revolver calibers, it does that, and if desired and appropriate for the caliber, forces the case mouth to bend into a crimping groove in the bullet.

Most resizing dies include removable decapping pins if you prefer to knock out the old primers in this step.
Note the carbide ring in the .40 die on the left.
A die always works in conjunction with a reloading press. The press holds the die in place while providing some form of mechanical leverage to drive a cartridge case into the die. So the die remains stationary while you force the case into it to create the desired result.
Depending on your choice of press, you may need an optional shell holder adapter for each caliber you intend to reload. This is a metal disc that rides on the top of the press cylinder, which pushes the case into the die. Its purpose is to secure and center the case so it enters the die consistently for each operation. Some presses have a universal, self-centering case holder that requires no caliber-specific shell holders.

Most reloading presses require caliber-specific shell holders to secure and guide the case into the center of the dies.
Sizing Considerations
For handgun reloading, many (most?) dies feature an interior carbide ring around the die mouth interior. This reduces the need to lubricate the cases during sizing. During resizing, we’re dealing with jamming an oversized brass case into a smaller steel mold, so there is always the potential for the case to get stuck in the die.
In technical terms, this is a bummer. A stuck case usually requires a tool, either made at home or purchased, to pull the case from the die without damaging the die itself. No, there’s very rarely a successful outcome when trying to drive or pull out a stuck case by hand. Ask me how I know. Or ask the die companies how many times I’ve ordered a replacement die after destroying one, trying to take shortcuts.
Decapping Considerations
Decapping is the reloading community’s term for punching out the old primer. Resizing dies almost always include a decapping pin, allowing you to combine resizing and decapping in one step.
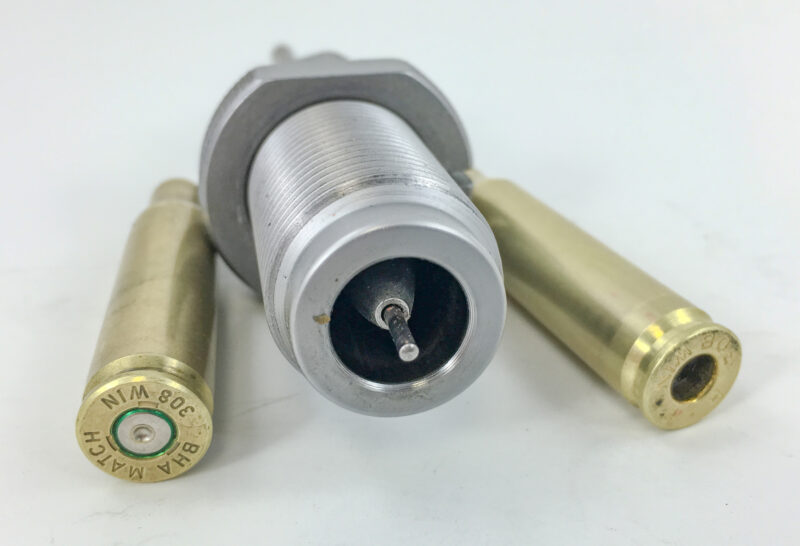
A rifle resizing die with the decapping pin installed. It simply pushes the old primer out during resizing.
However, there are sound reasons to treat decapping as a separate operation. Many reloaders remove old primers prior to cleaning, allowing the cleaning process to scrub the interior of the primer pocket. If you use a wet cleaning method, decapping first also helps the cases dry more easily, as there is at least a little bit of airflow through the base of the case.
If you choose to follow the decapping first approach, there are specific dies with a large interior diameter that don’t touch the case body itself, but include a decapping pin. Translation: You can run various calibers of dirty brass through the same die by design. Handy!
The Process
Now that we’ve covered the explanation of the step, the process is pretty anticlimactic. At this point, you should have a press, a set of dies, and clean brass ready to resize.
As this series is focused more on handgun reloading, we won’t get into various case lubrication strategies just yet. Most handgun rounds, meaning the straight wall “standard” cartridges, won’t require any lube treatment before going into a carbide ring resizing die, but I’ve found the process goes a lot smoother if you spread out a bunch of cases on a cookie sheet and dust them with some Hornady One-Shot lube spray. Swish them around and let them dry for a few minutes before you start, and you’ll find the process requires less muscle. I like the One-Shot for this use, as no subsequent wipe-down or cleaning is required. It dries quickly and doesn’t leave a mess.

With rifle rounds, you must lubricate (and later clean) cases before resizing. Generally, when using handgun dies
with carbide rings, you can skip that step.
When you install the sizing die in your press, you’ll have the opportunity to adjust the “height” relative to the shell holder. As you screw the die into the press, make sure the shell holder is in place on the pistol and raise it to its highest point. Now, screw in the die until it just touches the surface of the shell holder. Gently lock the die in place finger tight, and do a gentle test run with no case present. Most presses will “cam over” a bit when they encounter pressure, such as the shell holder hitting the base of the die. I like them to just barely meet with a slight bit of pressure as the pistol reaches its full travel. It’s important to make sure you size the brass all the way down to the base, so don’t leave a gap. Too much and you’ll start damaging your equipment, so keep it light. Once you like the fit, you’re off to the races.
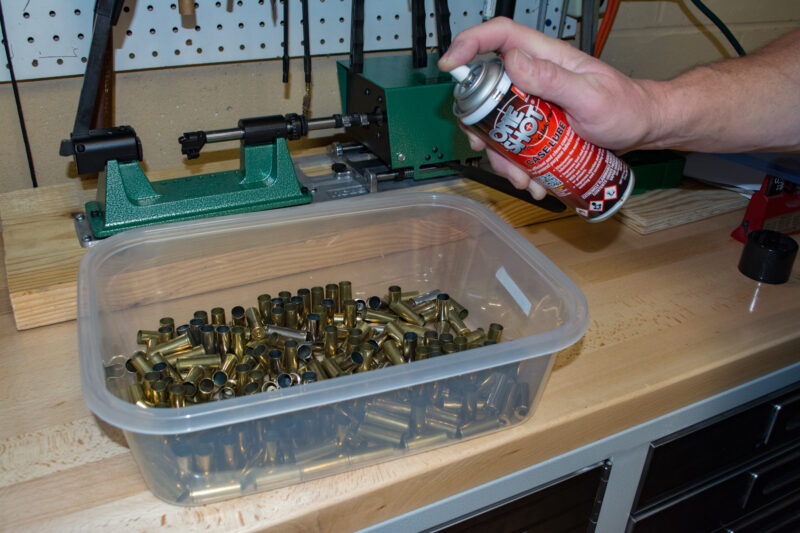
Thought not required, I like to apply a light coating of Hornady One-Shot drying lube.
No cleaning required and it makes the process go smoother.
But don’t race! From this point on, your resizing operation includes placing a case in the shell holder, operating the lever on your press through its full cycle — gently. Reverse and remove the case when the pistol is fully down. Repeat. And repeat a bunch more. Before long, you’ll have a bucketful of sized brass.
You’ll be tempted to step on the gas and whip through the pile. Don’t. Careful, repeatable operation is the name of the game in all reloading steps. The faster you go, the more likely you’ll make a mistake. If you’re knocking out primers in this step too, moving fast increases your odds of sending a case through slightly out of alignment, which tends to facilitate breaking the decapping pins on your sizing die when the pin just misses that tiny little hole inside.
And there you have it. The simple, and quite necessary step of resizing cases!
Read Part 5 (Case Mouth Expanding).
If you missed Part 3 (Time To Clean Brass).
Get more exclusive online content from American Handgunner delivered straight to your inbox. Sign up for our free American Handgunner Insider newsletter.